Scales of Talaxis Terrain Rules
Source: Warhammer Community
There are few places as bizarre and unsettling as the Sundered Scales deep in the heart of the Gnarlwood. Littered with shattered Seraphon pylons, malfunctioning celestial artefacts and erratic spawning pools, there is opportunity here for glory and death in equal measure. Even the ground itself is treacherous, with deep swamps causing even the most tenacious warriors to struggle in battle. The rewards are great, and greed is motivator enough to see countless warbands march on the Sundered Scales. Will you sink beneath the mire, to be forgotten, or harness the very power of the stars themselves and ascend to greatness?
Welcome to the Sundered Scales, a place as dangerous and lucrative as any to be found in the Mortal Realms. On this page you will find all the rules you need to play games in this hazardous, primeval swamp.
Entering the Sundered Scales
If a terrain card with the Sundered Scales () runemark is in play, a Sundered Scales Swamp battlefield mat must be used. The Sundered Scales Swamp has 2 sides, each of which features multiple swamp board features.
Swamp Board Features
The swamps of the Sundered Scales are turgid, cloying environments that sap the stamina and drain the strength of blows made by those within them. Some Warcry battlefield mats have pools of swampy water printed on them. These are called swamp board features. Swamp board features have an effect in-game on fighters that stray into them. Tactical thinking and clever positioning will be required to minimise their effects on your fighters and maximise their effects on enemy fighters.
Swamp Board Feature Effects
Subtract 1 from the Strength characteristic (to a minimum of 1) of melee attack actions made by fighters wholly within a swamp board feature. Subtract 1 from the Toughness characteristic (to a minimum of 1) of fighters wholly within a swamp board feature.
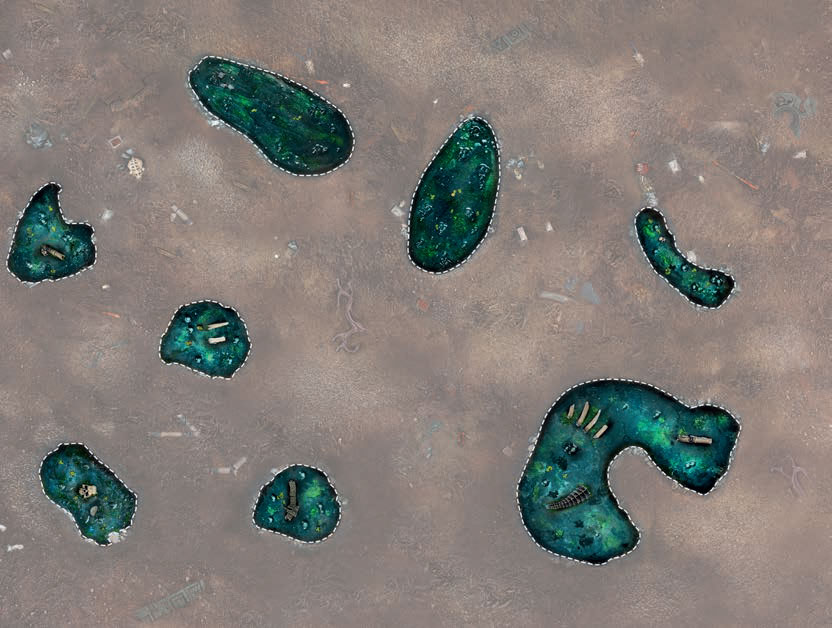
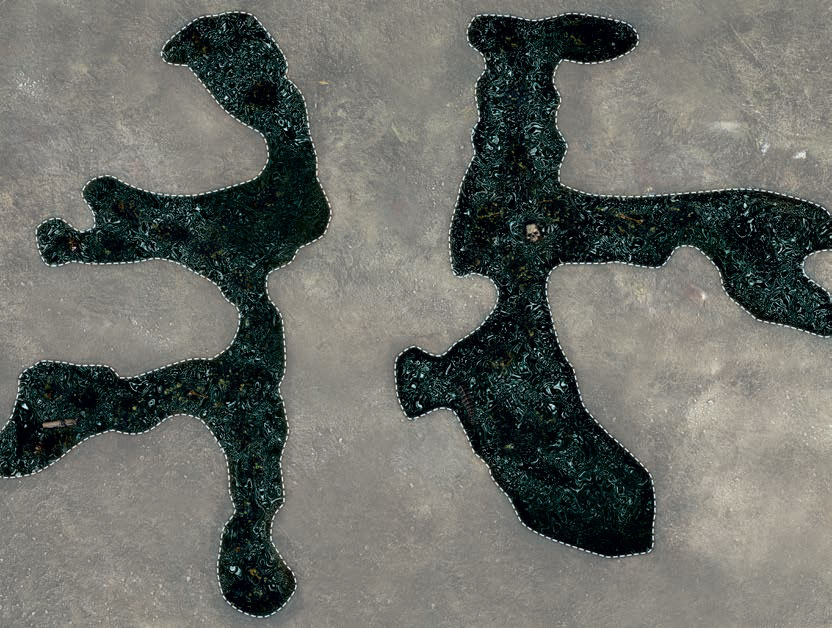
The highlighted sections of the battlefield mats are swamp board features and represent the hazardous, murky waters of the Sundered Scales.
Sundered Scales Terrain Rules
Entering the Sundered Scales is to invite near-certain death. Its gnarloaks grow cunning, appearing to play dead or camouflaging their predatory nature to lure unsuspecting victims to their demise while others grow bloated as a veritable feast of unfortunate victims are thrown into their barbed mouths.
This section includes detailed pictures of each of the Sundered Scales terrain features and labels which parts of them correspond to which terrain types as outlined in the core terrain rules.
In addition, if you are using a terrain map with the Sundered Scales () runemark, there are special rules for the Elder Gnarloak, Starfire Pylon, Idol of Motzlpota and the rope bridges.
If you are using the alternative terrain rules, you can agree with your opponent if you wish to use these special rules.
Troves
Some terrain features are troves, in addition to other terrain types. A fighter within 1" of a trove can use the following ability:
[Double] Ransack: Roll a dice. On a roll of 1-2, allocate D3 damage points to this fighter. On a roll of 3-4, remove 3 damage points allocated to this fighter. On a roll of 5-6, add one wild dice to your saved wild dice.
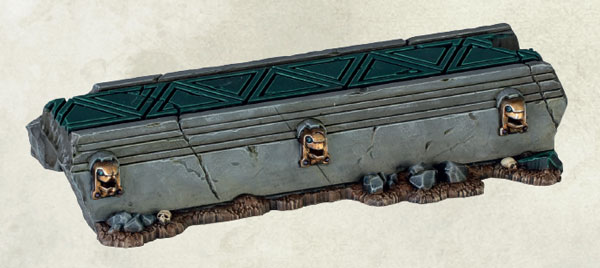
Stone Walkways
Stone walkways are platforms.
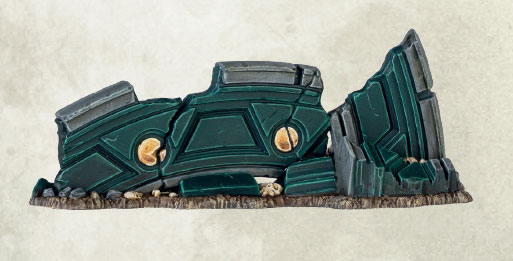
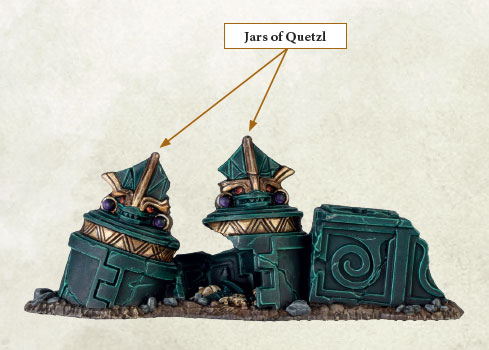
Stone Ruins, Shattered Post and Jars Of Quetzl
The Stone Ruins, Shattered Post and Jars of Quetzl are all obstacles. Parts less than 1" high vertically are low terrain. The Jars of Quetzl are troves.
Designer's Note: The fastest way for a fighter to scale an obstacle such as a ruin is to climb one side and then jump down from the top.
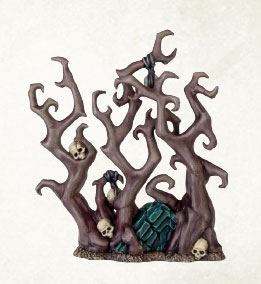
Gnarlbriar
Gnarlbriars are deadly terrain and obstacles.
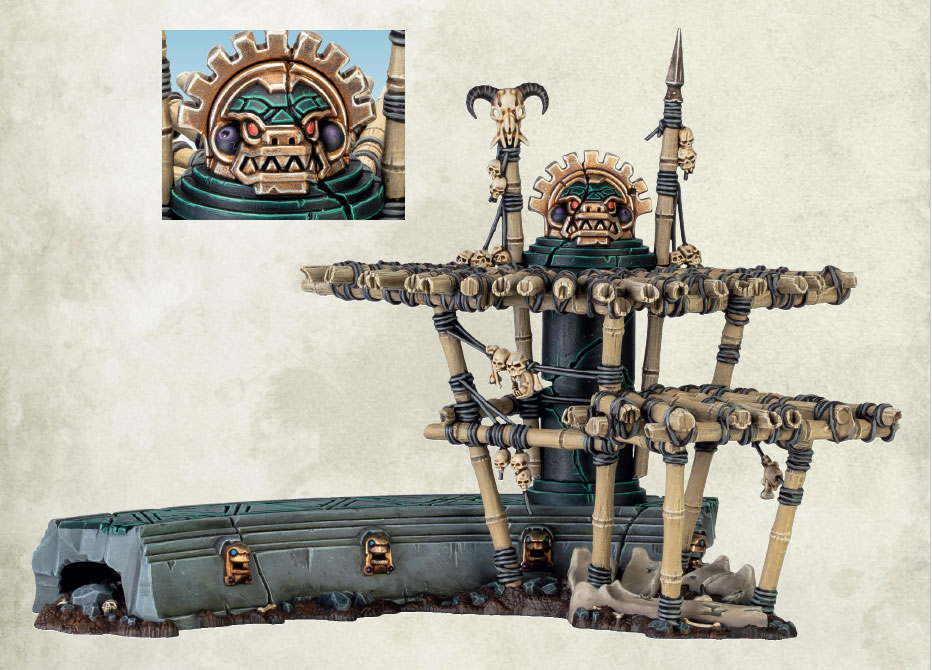
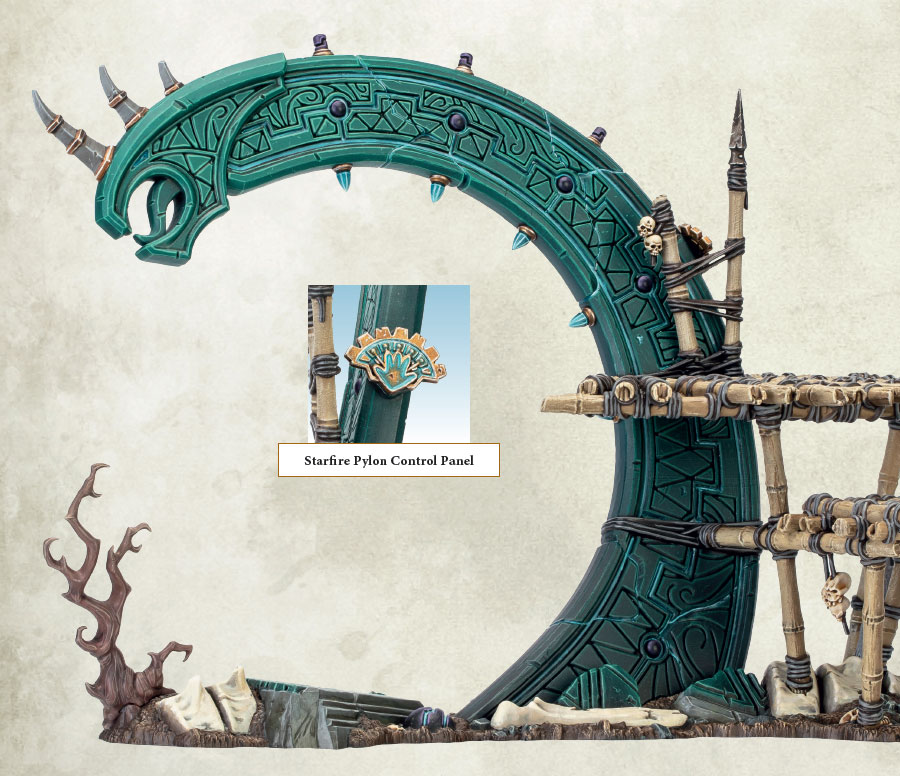
Starfire Pylons
Not even the Seraphon know the true depth of function these mysterious relics of the Old Ones possess. Now damaged and malfunctioning, they threaten mortal peril to those that would seek to decipher their esoteric glyphs.
The pylon is an obstacle as are any support struts. The wooden platforms are platforms. Parts less than 1" high vertically are low terrain. The gnarlbriars are deadly terrain and an obstacle.
Special Rules
Spawning Pools: Each swamp board feature (see above) within 1" of one or more Starfire Pylon terrain features is a spawning pool, in addition to the swamp board feature rules.
A spawning pool can be dormant or energised. Unless specified, each spawning pool begins a battle dormant.
A dormant spawning pool has no additional rules. If a spawning pool that was already dormant becomes dormant (because of an ability or other rule), nothing happens.
An energised spawning pool is deadly terrain.
Activate the Pylon: A fighter within 1" of a Starfire Pylon's control panel can activate it by using the following abilities:
[Double] Rushed Deciphering: Roll a dice. On a roll of 1-3, each spawning pool within 1" of the activating Starfire Pylon becomes dormant. On a roll of 4-6, each spawning pool within 1" of the activating Starfire Pylon becomes energised. If a spawning pool that was already energised becomes energised, allocate D6 damage points to this fighter.
[Triple] Cautious Deciphering: Roll a number of dice equal to the value of this ability then pick one: If the dice you picked was a 1-3, each spawning pool within 1" of the activating Starfire Pylon becomes dormant. If the dice you picked was a 4-6, each spawning pool within 1" of the activating Starfire Pylon becomes energised. If a spawning pool that was already energised becomes energised, allocate D6 damage points to this fighter.
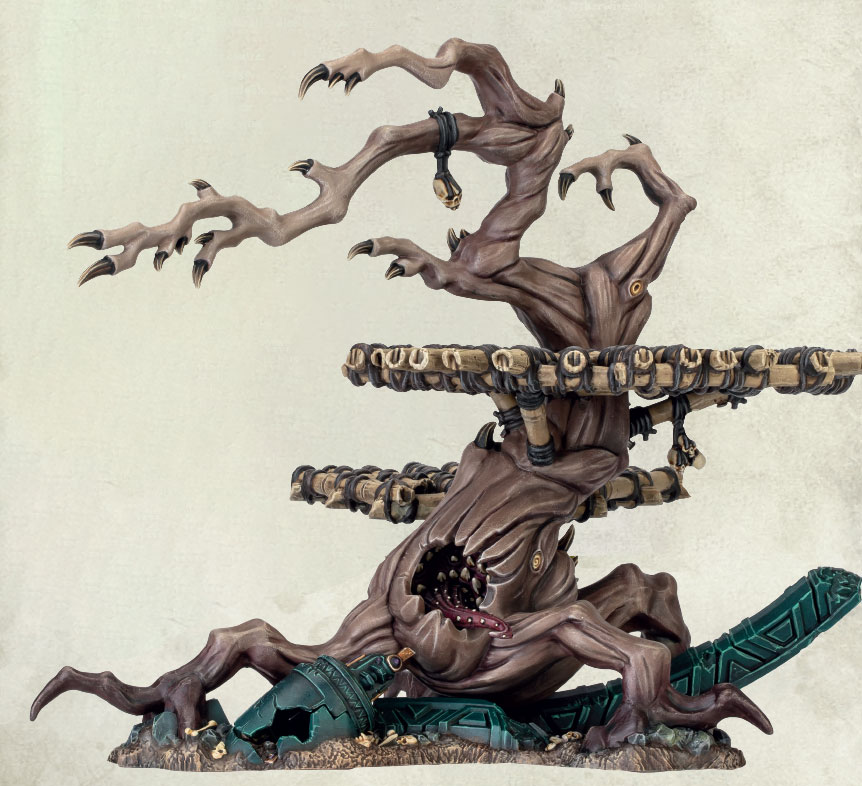
Elder Gnarloaks
Gnarloaks that feed upon the fluids of a Seraphon spawning pool become suffused with predatory cunning – these monstrous trees now play dead, only to thrash into life to feed upon their victims before they can even blink.
The trunk of the Elder Gnarloak is deadly terrain and an obstacle, as are any support struts. The wooden platforms are platforms. The Jar of Quetzl at the base of the Elder Gnarloak is a trove. Lastly, the branches are unscalable.
At the start of a game, each Elder Gnarloak is slumbering. At the end of each battle round, roll a dice for each slumbering Elder Gnarloak to see if it is awake. If the roll is equal to or less than the battle round, the Elder Gnarloak is no longer slumbering and is awake; play through the following sequence:
- Each fighter that has the centre of their base on a platform that is part of that Elder Gnarloak terrain feature falls one after the other, in an order chosen by the player who has the initiative. When a fighter falls, if there is nowhere vertically lower that they can be placed, they are taken down. Otherwise, when a fighter falls in this manner, roll 3 dice for impact damage instead of 1.
- Each fighter that has the centre of their base on a rope bridge attached to that Elder Gnarloak falls one after the other, in an order chosen by the player who has the initiative. When a fighter falls, if there is nowhere vertically lower that they can be placed, they are taken down. Otherwise, when a fighter falls in this manner, roll 3 dice for impact damage instead of 1. Once each fighter on such a rope bridge has fallen, the rope bridge is removed from the battlefield.
- The players roll off. The winner places a token within 6" of that Elder Gnarloak. Allocate D6 damage points to each fighter within 6" of that token, then remove that token from the battlefield.
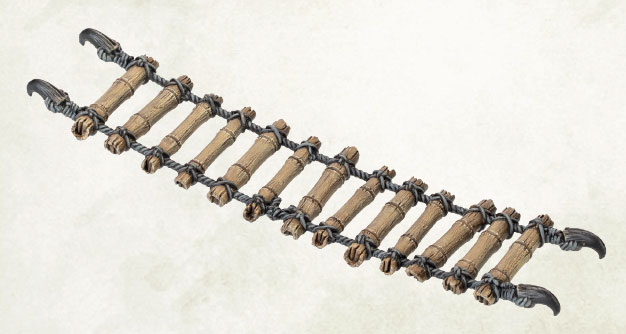
Rope Bridges
Rope bridges are platforms.
Special Rules
Objectives, Treasure and Tokens: Objective markers, treasure tokens and all other tokens cannot be placed on rope bridges.
Cutting the Ropes:** A fighter that is within 1" of a rope bridge but not on it can attempt to destroy it as an action. If they do so, roll 3 dice and add 1 to the score of each roll if the fighter is a monster or has any melee weapons with a Strength characteristic 5 or greater. If 1 roll scores 6+, the rope bridge is damaged. If 2 or more rolls score 6+, the rope bridge is **destroyed**.
The first time a rope bridge is damaged, it is weakened. This has no immediate effect, but players should be wary of sending their fighters across it from that point on. The second time a rope bridge is damaged, it is destroyed.
When a rope bridge is destroyed, every fighter that has the centre of their base on that rope bridge falls one after the other, in an order chosen by the player whose turn is taking place. When a fighter falls, if there is nowhere vertically lower that they can be placed, they are taken down. Otherwise, when a fighter falls in this manner, roll 3 dice for impact damage instead of 1. Once each fighter on the rope bridge has fallen, the rope bridge is removed.
Alternative Terrain Rules
If you are using terrain cards, all rope bridges are positioned so that fighters can stand on them without falling off. If you are using the Alternative Terrain rules from the Core Book, there might be rope bridges on the battlefield that are too steeply angled for a fighter to be placed upon them. In these cases, we recommend that players agree to use the ladder rules (Core Book, pg 73) for that rope bridge rather than the platform rules.
Idol Of Motzlpota
Supposedly bearing the gaze of the Slann Starmaster Motzlpota, this icon crackles with unpredictable energy. While its true purpose is unknown, some intrepid warriors have harnessed the power of this faltering icon.
The idol and pillar are obstacles, as are any support struts. The wooden platforms and stone platform are platforms. Parts less than 1" high vertically are low terrain.
Motzlpota'S Gaze
A fighter within 1" of the idol can attempt to harness the celestial energy lashing about the idol by using the following ability:
[Double] Infuse with Energy: Roll a dice. Add 1 to the result if this fighter has the Priest () runemark and/or the Mystic () runemark. On a roll of 5+, pick one of your [doubles], [triples] or [quads] and a number between 1 and 6. Change the value of that ability to the number you picked.