The Depths of Sylontum
The Dark Master Be'lakor and his legion have laid siege to the ancient city of Sylontum, Lady Olynder's seat of power at the heart of the fallen Dolorum Empire in the Prime Innerlands of Shyish. While the din of battle rages above, Be'lakor and his daemonic champions plunge into the depths of the capital. They search for the Sanctum of Anguish, the location of Lady Olynder's most fiercely guarded secret, for housed within are her skeletal remains – the link that tethers her soul to the Mortal Realms.
Narrative Campaign
This is a narrative campaign for 4 or 6 players. The players are divided into 2 teams. One team is the Agents of Be'lakor, tasked with locating the Sanctum of Anguish which houses the skeletal remains of Lady Olynder. The other team is the Emerald Host – the army of Lady Olynder, set to defend her stronghold of Sylontum from any invaders.
The campaign lasts for 3 battles in total, making for a perfect evening or weekend of gaming. During the campaign the players on each team will fight battles against the warbands on the other team before a final climactic Coalition of Death battle is fought between all players.
Getting Ready
Each player musters a warband under the following guidelines:
Each player musters a warband of 1,000 points.
For each Agents of Be'lakor player, all fighters in their warband must share 1 of the following faction runemarks:
- Daemons of Khorne ()
- Daemons of Tzeentch ()
- Daemons of Nurgle ()
- Daemons of Slaanesh ()
For each Emerald Host player, all fighters in their warband must have the Nighthaunt faction runemark (), or all fighters in their warband must have the Soulblight Gravelords faction runemark ().
Fighting Campaign Battles
Once the warbands are mustered, the campaign is ready to begin. For the first 2 battles each warband battles against a different warband from the enemy team. The players decide who fights whom. Fight each of these campaign battles as follows:
-
Battle groups are assigned as normal.
-
The Agents of Be'lakor player chooses one of the following tactics and notes it down in secret: Barrel Forwards, Advance Cautiously or Flank.
-
The Emerald Host player chooses one of the following tactics and notes it down in secret: Fall Back, Stand Fast or Counter-attack.
-
The players reveal their tactics and consult the matrix below: this determines the Deployment and Victory cards. In addition, if the battle matrix states that one side has the advantage, that player gains 1 additional wild dice in the hero phase of the first battle round.
-
A player sets up the terrain: we recommend ruins and mausoleums to resemble the ramparts and sanctums of Sylontum.
-
The player who did not set up the terrain chooses which player uses which deployment points and orientates the deployment card.
-
Any instructions on the victory card are carried out.
-
A player rolls a dice on the Twist table to determine which twist is in play.
D6 Twist Card 1 Eerie Silence 2 Dead of Night 3 Insidious Malignants 4 Winds of Rot 5 Bloodwind 6 Winds of Fate -
The battle begins.
The Aftermath Sequence
The players use a different aftermath sequence as follows:
- Rather than earning glory, each player records the number of victories they earn.
- The players make injury rolls and destiny rolls as normal.
- The player who won the battle makes 2 search rolls on the lesser artefacts table – the other player makes 1 search roll.
- No other steps are taken, including adding and removing fighters from a player's warband. If a fighter is slain the player must continue without them – there is no time to muster reinforcements!
The Final Battle
The third battle of the campaign is the final battle of the campaign and its outcome will determine which side is declared the overall winner of the campaign. This final battle is a Coalition of Death battle that uses the ‘The Gates of the Sanctum' battleplan.
Continuing the Narrative
The Age of Sigmar supplement Broken Realms: Be'lakor includes the battleplan ‘In the Court of Death' which allows you to play out the climactic showdown between Be'lakor and Lady Olynder in the Sanctum of Anguish.
Depths of Sylontum Battle Matrix
Emerald Host tactics are along the top, and Agents of Be'lakor tactics are on the left.
| Fall Back | Stand Fast | Counter-attack | |
|---|---|---|---|
| Barrel Forwards | The daemonic forces surge forwards, isolating a contingent of gheists and preparing to destroy them. | ||
| Advantage: Agents of Be'lakor Deployment: Defiant Stand The Agents of Be'lakor player is red. Victory: Isolated The Agents of Be'lakor player is the attacker. | The Emerald Host stand fast and meet the charging daemons head on. Deployment: Show of Strength Victory: Vanquish | Using hidden passages within Sylontum, the Emerald Host ambush their foe! Advantage: Emerald Host Deployment: Outflank The Agents of Be'lakor player is blue. Victory: Assassinate The Agents of Be'lakor player is the defender. | |
| Advance Cautiously | With neither side daring to make the first attack, a stalemate ensues that must be broken. Deployment: Stand-off Victory: [Dominate](/docs/battles/battleplan-generator/victory-conditions#dominate | Holding a valuable position within Sylontum, the Emerald Host prepare to defend it to the end. Advantage: Emerald Host Deployment: Frontal Assault Victory: Seize Territory The Agents of Be'lakor player is the attacker. | Be'lakor's daemons draw the forces of death into a trap! Advantage: Agents of Be'lakor Deployment: Bait The Agents of Be'lakor player is red. Victory: Ebb and Flow The Agents of Be'lakor player is the defender. |
| Flank | The Emerald Host attempt to fall back to a stronger position, leaving the daemons with little of worth. Advantage: Emerald Host Deployment: Stranglehold The Agents of Be'lakor player is blue. Victory: Scorched Earth The Agents of Be'lakor player is the attacker. | The servants of Lady Olynder find themselves cut off by a flanking force and must battle their way out. Advantage: Agents of Be'lakor Deployment: Refused Flank The Agents of Be'lakor player is blue. Victory: The Gauntlet The Agents of Be'lakor player is the attacker. | As both forces seek to outmanoeuvre the other, blades are drawn and battle commences. Deployment: First Blood Victory: Shock and Awe |
The Gates of the Sanctum
The Agents of Be'lakor have fought their way deep into the depths of Sylontum and now stand at the gates of the Sanctum of Anguish. Here they begin to enact a fell ritual to unbind the wards that protect Lady Olynder's resting place. As the spell is being worked a tide of spectral dread sweep down upon them, desperate to stop the daemons at all costs.
Coalition Of Death
This battle uses the Coalition of Death rules, with the exception of the Battleplan rules.
The Warbands
Each player uses their warband from the campaign. The battle is between the 2 teams – the Agents of Be'lakor and the Emerald Host.
Each team totals the number of victories its players have earned in the campaign so far. If one team has a greater number of victories, the players on that team each receive 1 additional wild dice to use in this final battle.
Terrain
The players on 1 team set up the terrain to resemble the garden-mausoleums of Sylontum.
Deployment
See map. The players on the team that did not set up the terrain orientates the deployment map.
The Agents of Be'lakor are red, and the Emerald Host are blue.
Each team will start with 1 battle group on the battlefield and 2 battle groups in reserve. The battle group that starts on the battlefield is determined randomly for each team. 1 player on the Agents of Be'lakor rolls a D3. On a 1, that team sets up their Daggers anywhere in their deployment zone, on a 2, their Shields and on a 3, their Hammers. Then, the Emerald Host does the same.
The Agents of Be'lakor begin the battle with a ritual score of 0. This score will be used to determine the winner of the battle.
Reserves
In each reserve phase, each player on the team with the initiative rolls a dice. If the score of at least 1 player's roll is equal to or less than the current number of the battle round, that team can pick 1 of their battle groups in reserve and set it up on the battlefield. Then, the team without the initiative does the same.
When setting up fighters from reserve, the Agents of Be'lakor players must set them up within 3" of their battlefield edge.
When setting up fighters from reserve, the Emerald Host players must set them up within 3" of any battlefield edge and more than 5" from all enemy fighters.
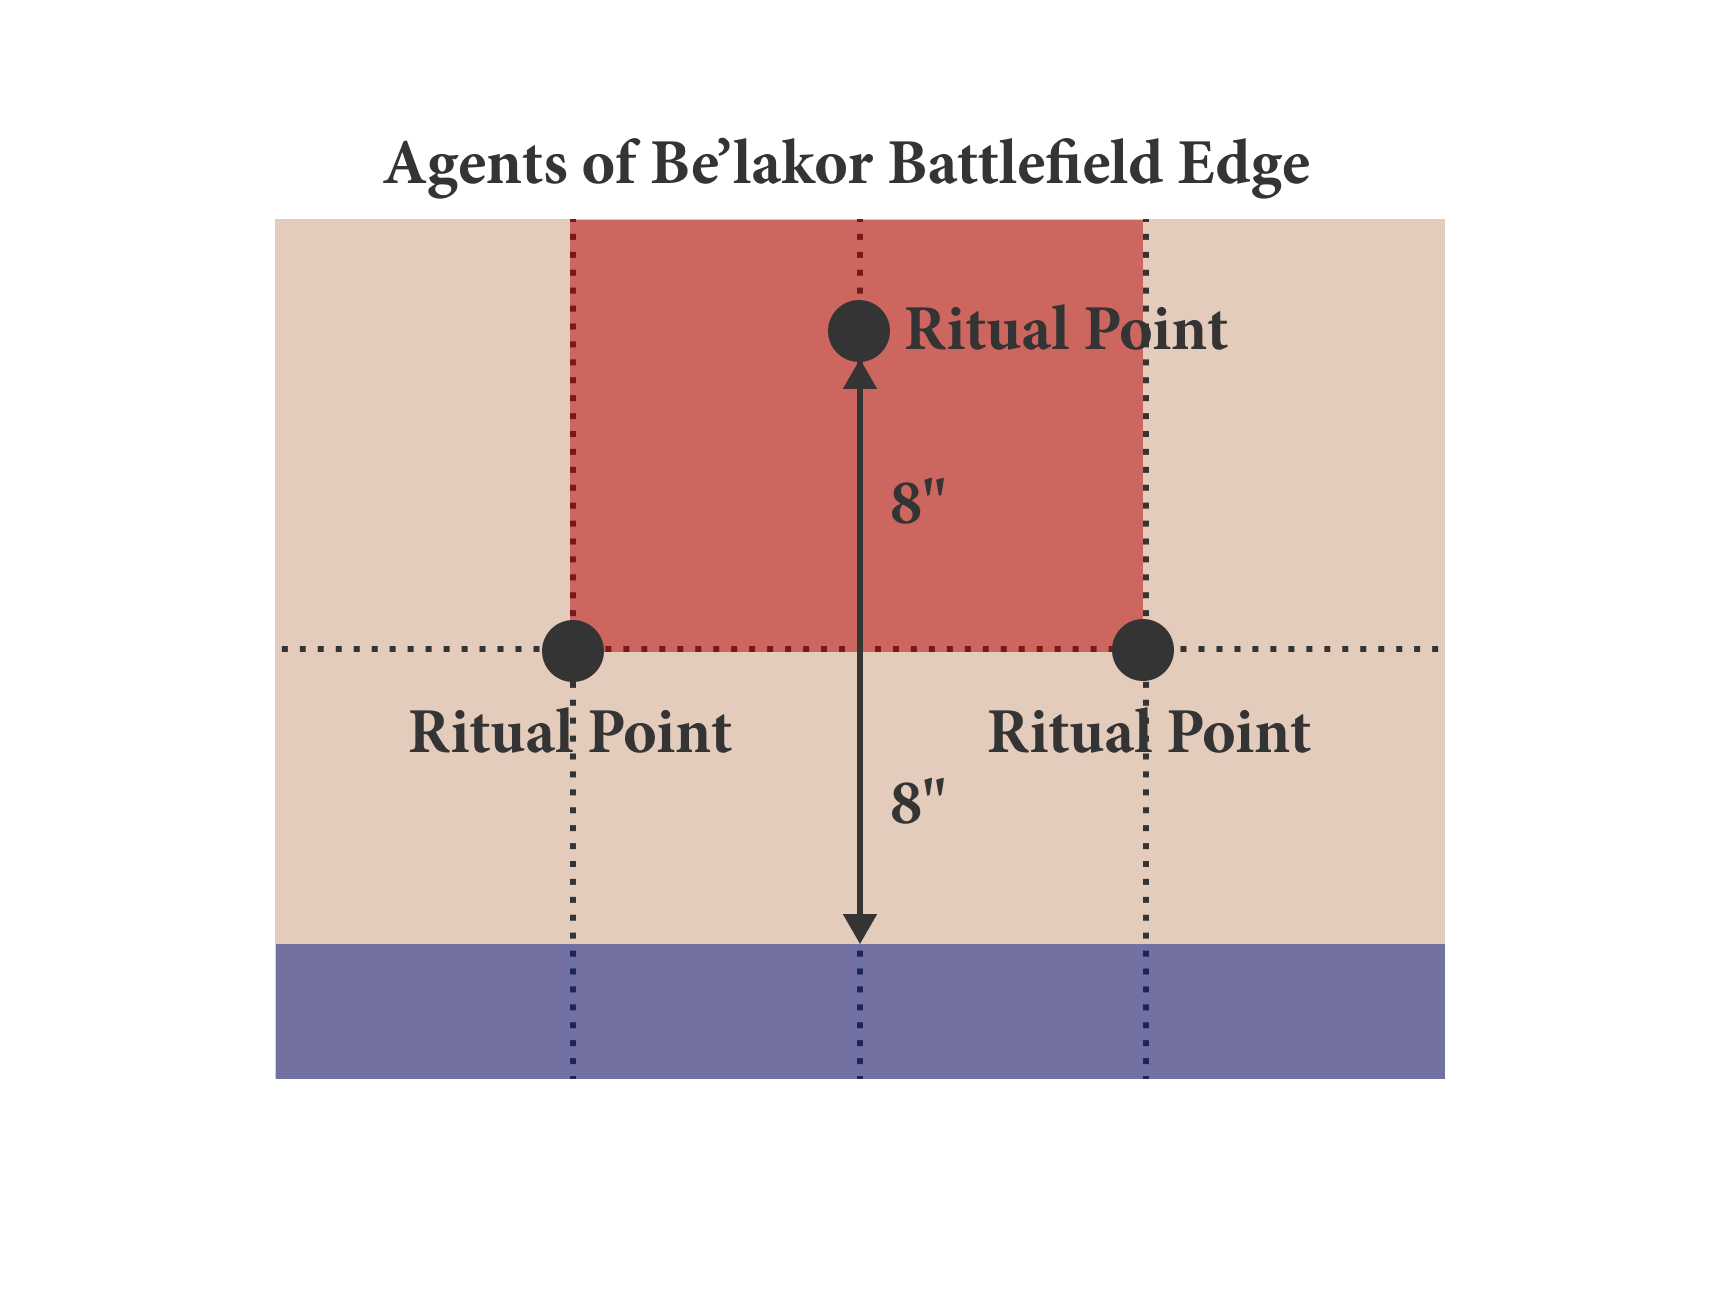
Victory
3 objective markers, called ritual points, are set up on the battlefield as shown on the map.
At the end of each battle round, the Agents of Be'lakor add D3 to their ritual score for each ritual point they control (roll for each). They then subtract D3 from their ritual score for each ritual point controlled by the Emerald Host (roll for each).
The battle ends after 4 battle rounds. If the Agents of Be'lakor have a ritual score of 10 or more, they win the battle. Otherwise the Emerald Host wins the battle. The winning team of the battle is declared the overall winner of the campaign.
Twist
At the start of each battle round after the first, each team gains a number of wild dice equal to the number of ritual points controlled by the enemy team. These wild dice are distributed amongst each team's players as they see fit.