The Rat Hunters
Upon the Coast of Tusks in Ghur, the free city of Excelsis is reeling in the wake of a skaven attack led by the maniacal Warlock Bombardier, Rattachak. To make matters worse, there are rumours of a colossal force of orruks to the south, marching under the banner of the mighty warlord Gordrakk. The powers of the city are hiring any who can lend their blade, with the first taks being to defeat the verminous skaven that lurk in its shadows still.
Narrative Campaign
This is a narrative campaign for 1 or 2 players. Each player musters a warband of mercenaries, hired by the powers of Excelsis to rid the city of its skaven infestation. In this campaign, rather than players battling against one another, they and their warbands team up together to battle hordes of skaven - the Vermintide - that are controlled by the game. The campaign lasts for 4 battles and can be played alone or collaboratively.
Getting Ready
If the campaign is being played by two players, each player musters a warband of 500 points. If the campaign is being played alone. the player musters a warband of 1,000 points. The warbands can be of any faction.
In addition to mustering warbnnds, the players will also need a collection of skaven models to represent the Vermintide. Any skaven models that have fighter cards in Agents of Chaos can be used. The players will need around 1,200 points of skaven fighters.
Fighting Campaign Battles
Once the above steps are completed, the campaign is ready to begin. The campaign lasts for 4 battles in total. The first 3 battles take place over 3 different locations: the Ironweld Armoury, the Dockside Alleyways and the Northern Sewer Entrance. It is up to the players to decide in which order they will battle at these locations: each location has a battleplan associated with it (see below). In addition, the size of the Vermintide warband will grow with each subsequent battle, making things more and more difficult for the players as the campaign progresses, so they should plan accordingly!
Fight the first 3 campaign battles as follows:
- The players choose 1 of the 3 locations for the battle. A battle can only be fought at each location once during the campaign.
- The total points value of the Vermintide warband is determined by the number of the battle as shown on the table below.
- The players pick fighters with the Skaven faction runemark () to be in the Vermintide warband. One fighter with the Hero runemark () must be included and picked to be the warband's leader.
- Battle groups are assigned as normal. The players sort the Vermintide warband into battle groups.
- A player sets up the terrain: we recommend buildings and ruins to represent the war-torn districts of Excelsis.
- A deployment card is drawn as normal. To orientate the deployment card, pick one of the long battlefield edges and roll a dice. On a 1-3, that battlefield edge is south, otherwise that battlefield edge is north. Then another dice is rolled. On a 1-3, the players use red, otherwise the players use blue.
- The rest of the battleplan is determined by the location (see below).
- The battle begins. Use the rules on below to control the Vermintide warband.
The Aftermath Sequence
There is no aftermath sequence for the Vermintide warband. The players use a different aftermath sequence as follows:
- If the players won the battle they gain the reward for that location.
- The players make injury rolls and destiny rolls as normal.
- The players then each make 1 search roll on the lesser artefacts table. If the campaign is being played alone, the player can make 2 search rolls instead.
- No other steps are taken, including adding and removing fighters from the players' warbands. If a fighter in their warband is slain they must continue without them - there is no time to muster reinforcements!
The Final Battle
The fourth battle of the campaign is the final battle of the campaign and uses the 'Ambush in the Dark' battleplan below. If the players win this battle, they win the campaign, otherwise they fail and the Vermintide win the campaign.
Continuing the Narrative
If you wish to continue the story of Excelsis you can find 3 battleplans for Age of Sigmar in Broken Realms: Kragnos that follow on from these events: 'Last Flight of the Scarlet Scourge', 'Dark Heart' and 'Of Gods and Monsters'. In addition, the battleplan 'They Came From Below' allows players to fight Rattachak's initial attack upon the city.
Battle Locations
Ironweld Armoury
A band of skaven have laid claim to this Ironweld Armoury, ruined in the wake of Rattachak's attack. You must rid this place of the foul vermin before they can take off with too much of the plundered black powder from within.
Battleplan
Victory: Defend the Find
The players are the attackers. The players pick one of the Vermintide's deployment points and set up all the treasure tokens within 3" of that deployment point.
Twist: Roll a dice:
| D6 | Result |
|---|---|
| 1-3 | Dusk |
| 4-6 | Battle Frenzy |
Reward
If the players win the battle, each player can pick 1 of their fighters to bear the following artefact of power:
Blastpowder Bombs: Made with Aqshian blastpowder, these munitions explode with devastating effect.
Once per battle, the bearer can use this artefact as an action. If they do so, pick a visible enemy fighter within 9" of the bearer and roll a dice for each fighter within 3" of that fighter. On a 4+, allocate D6 damage points to the fighter being rolled for.
Dockside Alleyways
Artillery bombardments during Rattachak's attack gave rise to a deadly inferno that swept through vast swathes of the dockyards, leaving naught but burnt out husk in its wake. Track down any of the skaven that linder still and deliver swift justice upon them.
Battleplan
Victory: No Mercy
Twist: Roll a dice:
| D6 | Result |
|---|---|
| 1-3 | Eerie Silence |
| 4-6 | Deluge |
Reward
If the players win the battle, in the aftermath sequence of this battle, fighters gain a destiny renown level on a 4+.
Northern Sewer Entrance
The tide of vile vermin that attacked the city did so through the sewers that run below, and while the entrances to these ancience tunnerls have been reclaimed elsewhere in Excelsis, those in the northern districts are still held by the skaven intruders. Take down the leader of these creatures and send the rest scurrying back into the darkness below.
Battleplan
Victory: Assassinate
Twist: Roll a dice:
| D6 | Result |
|---|---|
| 1-3 | Dead of Night |
| 4-6 | Eager for the Fight |
Reward
If the players win the battle, in each hero phase of the final battle of the campaign 1 of the players can receive 1 additional wild dice. The players choose in each hero phase who receives the additonal dice.
The Vermintide
In the battles in this campaign, the players and their warbands battle hordes of skaven controlled by the game. These enemy fighters are referred to as Vermintide fighters, and the following rules explain how they are used in battle.
Warband Strength
| First Battle | Second Battle | Third Battle |
|---|---|---|
| 800+ points | 950+ points | 1,100+ points |
Deployment
The players first set up all the Vermintide fighters as normal. Then the players set up all the fighters from their warbands as normal.
Determining Initiative
In the hero phase, the Vermintide has no initiative dice or wild dice. Instead, the Vermintide is always considered to have 3 singles for determining initiative and wins any ties automatically. If the campaign has 1 player, determine if they or the Vermintide has initiative. If there are 2 players, they and the Vermintide are sorted into an initiative order from first to last, determined by the number of singles each has.
Activating Vermintide Fighters
In the combat phase, players and the Vermintide take it in turns to activate fighters from their warband as normal. When it is the turn of the Vermintide, the players pick which Vermintide fighter activaties. Like any other fighter, a Vermintide fighter cannot be picked to activate more than once per battle round.
Vermintide fighters are always in one of 2 states: close or far. When a Vermintide fighter activates, the players first determine which state they are in as follows:
If the closes visible enemy fighter to the Vermintide is within range of any of the Vermintide fighter's weapons, the Vermintide fighter is said to be close, otherwise it is said to be far.
Once its state has been determined, a player rolls on the behaviour table below to see how that fighter will behave in its activation.
Vermintide Fighter Actions and Abilities
The behaviour table below shows the abilities and actions that the Vermintide fighter will make and the order in which they make them. Abilities are written in italics and actions are written in bold. The abilities used by Vermintide fighters can be found on the Vermintide abilities table below. These do not need or use any ability dice, and only Vermintide fighters can use these abilities. When it says 'Attack/Move', the fighter will attack unless there are no visible enemy fighters within range of any of its weapons, in which case it will instead move.
Move Actions
Move actions made by Vermintide fighters follow these rules:
- They move as close as possible to the closest visible enemy fighter. If more than one visible enemy fighter is equally close, the players pick 1 of those fighters.
- If there are no visible enemy fighters, they move as close as possible to the nearest enemy fighter that is not visible. If more than one enemy fighter that is no visible is equally close, the players pick 1 of those fighters.
- They always take the quickest route, jumpnig over pits or gaps and climbing obstacles if necessary.
- They will always jump down from platforms rather than climb down.
- They will never finish a move action above a pit.
- They will never climb dangerous terrain.
Attack Actions
Attack actions made by Vermintide fighters follow these rules:
- They target the closest visible enemy fighter that is within range of one of their weapons. If more than one visible enemy fighter is equally close, the players pick 1 of those fighters.
- If they have multiple weapons in range, they use the weapon with the lowest Range characteristic for the attack action.
Vermintide Behaviour Table
| D3 | Close | Far |
|---|---|---|
| 1 | Recuperate-Attack | Recuperate-Move |
| 2 | Attack-Attack | Move-Attack/Move |
| 3 | Deadly Strike-Attack-Attack | Charge-Attack/Move-Attack/Move |
Vermintide Abilities
| Ability |
|---|
| Charge: This fighter makes a bonus move action. At the end of that move action, if there are any visible enemy fighters within 1" of this fighter, the players pick 1 of those enemy fighters. Allocate D3 damage points to that fighter. |
| Deadly Strike: This fighter can use this ability only if there are any visible enemy fighters within 1" of this fighter. The players pick 1 of those fighters. Allocate D6 damage points to that fighter. |
| Recuperate: Remove up to 5 damage points allocated to this fighter (as many damage points as possible must be removed). |
Battleplan: Ambush in the Dark
Your band of mercenaries has waged war against the remnants of the skaven invasion, earning good coin for every severed rat tail brough back as a grisly trophy. Now you have tracked down the lair of a skaven warlord, gnawed out within the city walls itself. As you venture into the darkness you see the glisten of red eyes, rusty weapons and yellowed fangs in the gloom beyond. Weapons are drawn - this will be a bitter fight for your very survival, but if you can kill the warlord and escape to the surface, the skaven menace will be thwarted once and for all!
The Vermintide Warband
The players pick fighters with the Skaven faction runemark () to be in the Vermintide warband. The Vermintide warband must be at least 1,200 points. One fighter with the Hero runemark () must be included and picked to be the warband's leader. The players sort the Vermintide fighters into battle groups. The Vermintide leader is not put into a battle group and instead starts the battle in reserve.
Terrain
The players set up the terrain to resemble the skaven lair. Alternatively, if the players have a dungeon battlefield (see Warcry: Catacombs), that can be used.
Deployment
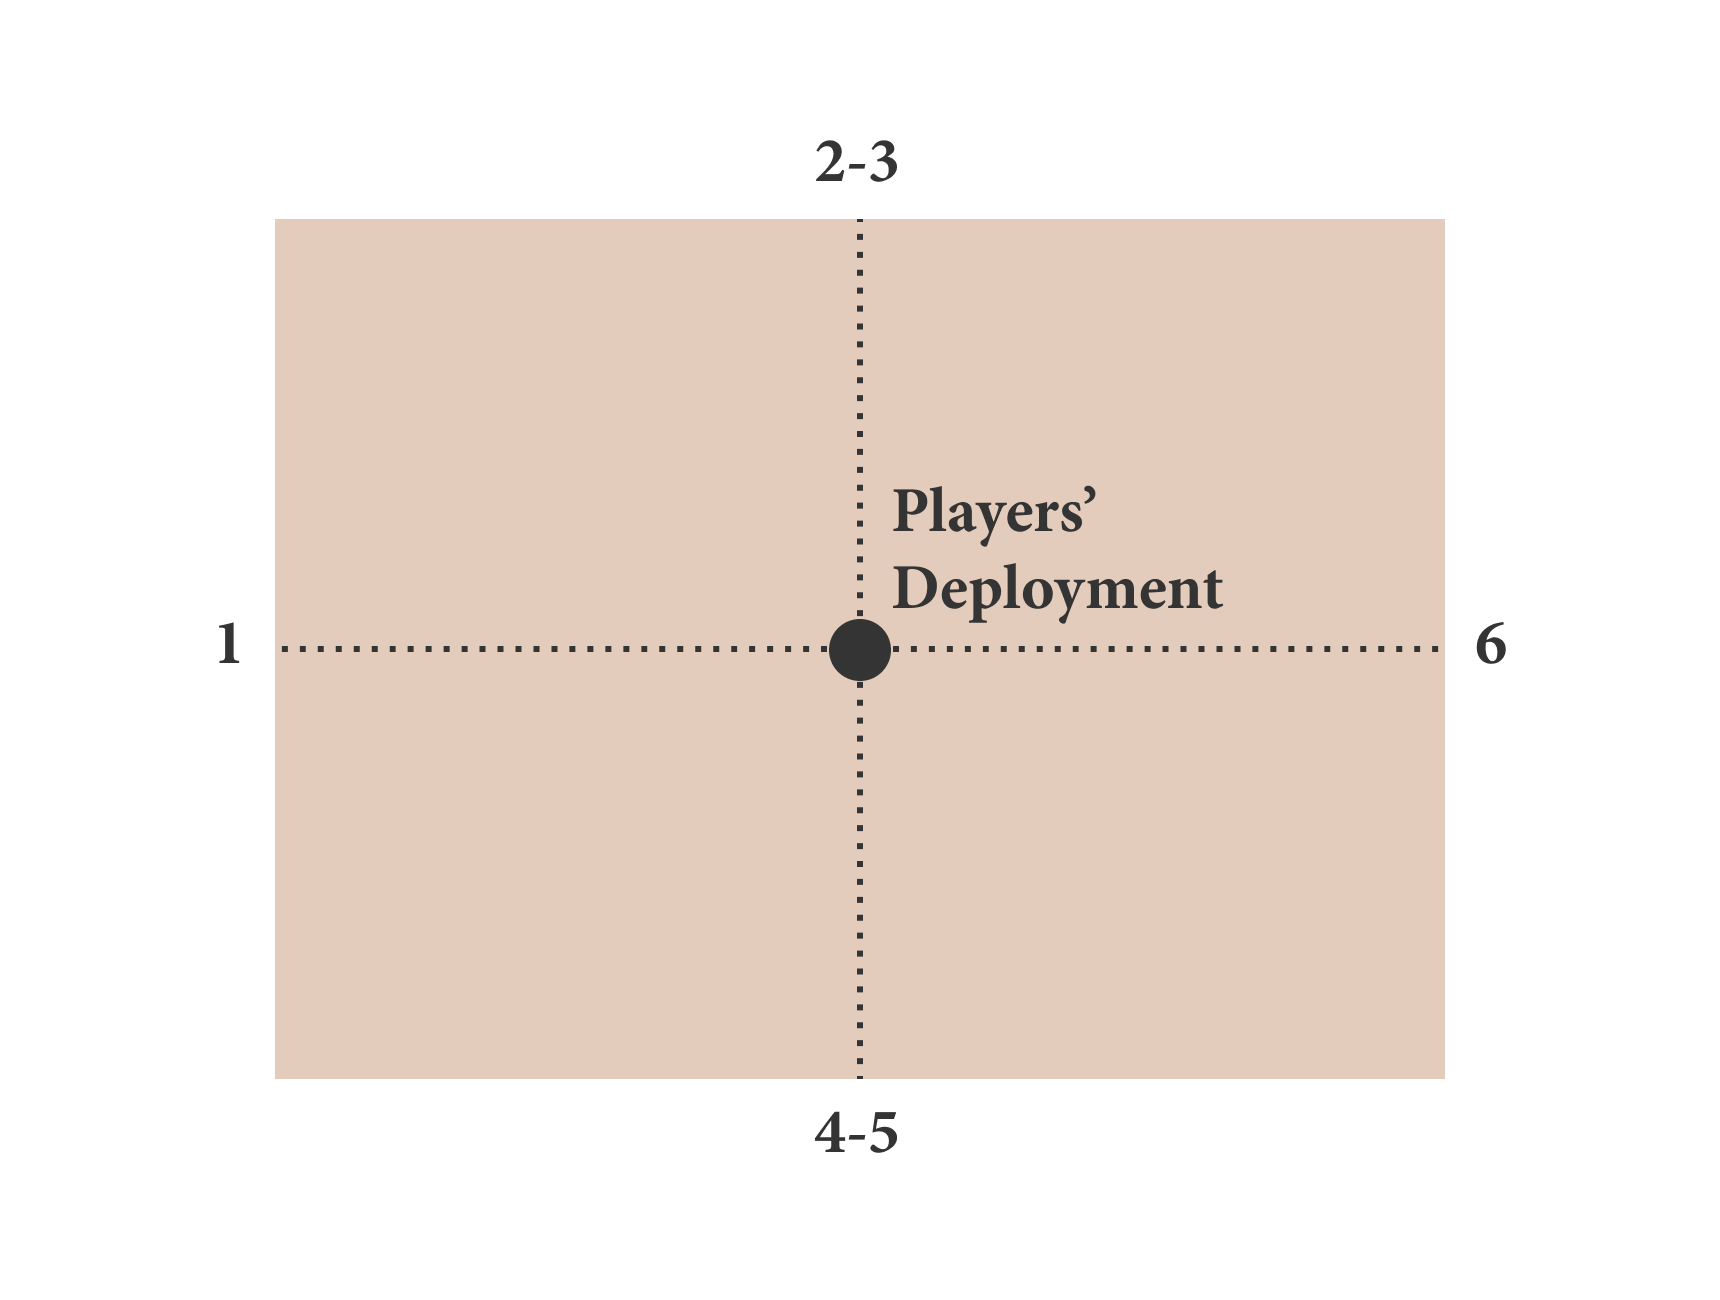
The players set up their fighters first. All fighters are set up within 3" of the centre of the battlefield.
The Vermintide fighters are then set up. To do so, a player picks 1 of the battle groups and rolls 1 dice. This roll corresponds to one of the battlefield edges (see map). All fighter from that battle group are set up on the battlefield as a single group - each must be within 3" of that edge of the battlefield and within 1" of another fighter in that battle group. This process is then repeated for the other 2 battle groups.
Victory
In the reserve phase of the third battle round, the leader of the Vermintide warband is set up on the battlefield as part of the battle group set up using the Endless Hordes rule (see below).
The players must take down the leader and then escape the battlefield. When the Vermintide leader is taken down, a player rolls a dice. This roll corresponds to one of the battlefield edges (see map) and marks it as the escape route. The players win the battle if, at the end of a battle round, a leader from one of their warbands is within 1" of the escape route and more than 3" from all enemy fighters.
Otherwise the battle ends when the player's leaders have ben taken down - the players lose the battle.
Twist
Endless Horde: In the reserve phase, any Vermintide fighters taken down in the previous battle round - other than the Vermintide leader - are combined into a new battle group and set up on the battlefield using the same rules as for deployment.