The Chotec Valley
Source: Warcry Core Book (Heart of Ghur)
The canopies of the Gnarlwood are ever in a state of flux, as even the plants seek to devour each other in an endless cycle. This shifting of the foliage can lead to new discoveries as previously inaccessible areas of the forest open up.
Recently, news has spread like wildfire amongst the seekers of Talaxis of a newly opened valley deep within the Gnarlwood, said to hold a fragment of the fabled ruin. Even the smallest fragment of wreckage can house relics of immeasurable value, especially one hidden for so long, and so your warband sets forth with haste, eager to be the first to find it.
As you venture deeper and deeper into the Gnarlwood, you learn that your rivals are not far behind. However, this is not the only danger you face, for this valley is the sacred hunting ground of the native Seraphon, and they do not take to trespassers kindly...
Introduction
The Chotec Valley is a campaign arc for 4 players. Each of the warbands is searching a newly discovered area of the Gnarlwood intent on being the ones to find the shard of Talaxis said to be hidden within. As you fighter your way deeper and deeper into this area of unexplored forest, it will not only be your rivals that you will face in battle, but also tribes of savage Seraphon set on driving back any intruders upon their sacred ground.
This campaign arc consists of 4 battles. Your warband will fight each of the others in turn before a final climatic battle is fought between all 4 players!
During the first 3 battles, a record will be kept of each warband's progress towards locating the shard of Talaxis. In the final battle, the players will be ranked according to how much progress they made; those who made more progress will gain bonuses to aid them in the final battle. The winner of the final battle is crowned the victor of the campaign arc, and rewards are given to all the players based on how well their warband fared.
Getting Ready
To play through this campaign arc, you will need to following:
- 4 players, each with a completed original roster for a warband that is not currently playing through a campaign arc.
- A selection of Seraphon miniatures to use as the Savage Seraphon. See below to see which Seraphon miniatures can be used.
Playing Through The Campaign Arc
This campaign arc comprises 4 battles for each player. Use a series of roll-offs to sort the players into an order. The first player is player A, the second player is player B, and so on. The first three rounds of battles are fought as follows.
| Round 1 | Round 2 | Round 3 |
|---|---|---|
| Player A vs Player B | Player A vs Player C | Player A vs Player D |
| Player C vs Player D | Player B vs Player D | Player B vs Player C |
Each of the battles uses the rules for a normal campaign battle. In addition, the rules for the Savage Seraphon are used as an additional twist in each battle.
Progress
During the campaign arc, the players records their progress made towards locating the shard of Talaxis. This is represented by a progress score, which is noted in the Campaign Arc section of their warband rosters. Each player begins the campaign arc with a progress score of 0.
In the first three rounds, before each battle is fought, each player must decide whether their warban will barrel forwards or advance cautiously. This will determine how much progress their warband makes depending on whether they win or lose the battle. As shown in the table below, barrelling forwards will increase a player's progress score by the most if they win the battle but by the least if they lose the battle, whereas advancing cautiously leads to more modest progess in the case of a victory but mitigates the lack of progress in case of a loss.
Each player secretly notes down their decision before the battle begins and then reveals it to their opponent at the beginning of the first battle round. At the end of the battle, the player's progress score increased by the amount shown in the table below.
Increase to Progress Score
| Barrelled Forwards | Advanced Cautiously | |
|---|---|---|
| Won the Battle | 6+D3 | 4+D3 |
| Drew the Battle | 3+D3 | 3+D3 |
| Lost the Battle | 1+D3 | 2+D3 |
The Final Battle
In the fourth round of the campaign arc, all four players fight each other using the 'Savage Showdown' Triumph & Treachery battleplan (below). This is the final battle in the campaign arc, and its outcome will determine who is declared the victor.
Savage Seraphon
In the final battle, no roll is made to determine when the Savage Seraphon are alerted to the presence of the warbands. Instead, they start arriving from the second battle round onwards.
In the final battle, if the activation roll of a Savage Seraphon fighter is a 1-2, the opponents of the activating player roll off and the winner can activate that Savage Seraphon fighter.
Progress Order
At the start of the final battle, they players rank themselves from first to last in order of the progress each has made. This is called the progress order. If any players have made equal progress, those players roll off to determine who comes before the other in the progress order.
Reserves
In each reserve phase of the final battle, players can roll a dice for each of their fighters in reserve that is not due to arrive on the battlefield in that battle round. This is called a reserve roll. On a 6+, tje foghter can be set up on the battlefield in the current reserve phase rather than later. Set up that fighter within 3" of their deployment point as normal. Each player also receives a bonus to reserve rolls based on where they come in the progress order:
| Progress Order | Bonus to Reserve Rolls |
|---|---|
| Last | No bonus |
| Third | +1 |
| Second | +2 |
| First | +3 |
Rewards
After the final battle has been fought, the campaign arc ends and the players receive the rewards described below:
The Winner
In step 5 of the aftermath sequence, the winner can relocate their encampment to a Shard of Talaxis and does not need to spend any glory to do so.
The Other Players
Each of the other players can roll once on the Gnarlwood Lesser Artifacts table. When doing so, instead of rolling a D66, they roll 1 dice and add 60 to the score (giving a result of 61-66).
Savage Seraphon
Each battle found in 'The Chotec Valley' has an additional twist: Savage Seraphon fighters will arrive on the battlefield and attack the warbands indiscriminately. The rules on this page explain how the Savage Seraphon work.
The Hunt
At the start of each battle in this campaign arc, one player rolls a D3. This determines how many battle rounds are played before the Savage Seraphon are alerted to the warbands' presence.
Once the Savage Seraphon ar alerted, at the start of each combat phase, the player with the initiative rolls a dice to determine the number of Savage Seraphon fighters that arrive on the battlefield in that battle round.
On this page are 5 Savage Seraphon fighter profiles. These fighters do not have points values; instead, each has a threat value between 1 and 3 (marked by the numer in the top right). The player with the initiative picks a number of Savage Seraphon fighters with a combined threat value equal to or less than the roll. That player then sets them up on the battlefield.
The Savage Seraphon fighters that arrive each battle round must be set up as a single group, each within 1" of at least 1 other fighter from the group and more than 5" from all fighters that are not Savage Seraphon.
Primal Intellects
In battle, the players will have the chance to activate Savage Seraphon fighters to attack their enemies. When it is a player's turn to choose a fighter from their warband to activate, they can instead choose a Savage Seraphon fighter to activate. When they do so, the player first rolls a dice. On a 3-6, they can activate that Savage Seraphon fighter as normal. On a 1-2, their opponent can instead activate that Savage Seraphon fighter. When this happens, it still counds as the turn of the player who chose the Savage Seraphon fighter, despite their opponent being the one who gets to activate it. Once a Savage Seraphon fighter has been activated, they cannot be picked to activate again.
Once a player has activated all the fighters in their warband, if there are still Savage Seraphon fighters in play that have not yet been activated that combat phase, the player must pick 1 of those Savage Seraphon fighters and cannot pass.
A Savage Seraphon fighter can never use the wait action as its first action in its activation and it cannot make reactions. Savage Seraphon fighters treat all fighters as enemy fighters, except for other Savage Seraphon fighters, which they treat as friendly fighters. When a player activates a Savage Seraphon fighter, they can use any of their ability dice to use abilities wit that Savage Seraphon fighter. A Savage Seraphon fighter can use universial abilities.
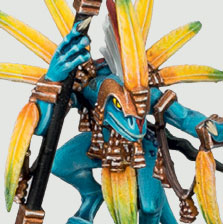
Savage Skink Starpriest
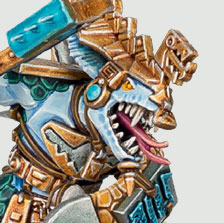
Savage Saurus Oldblood
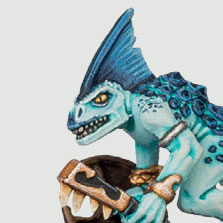
Savage Skink with Moonstone Club
Savage Skink with Boltsplitter
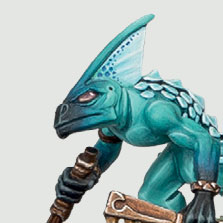
Savage Saurus Warrior
Triumph & Treachery: Savage Showdown
Four warbands have been ruthlessly searching a newly revealed valley in the Gnarlwood for a rumoured shard of Talaxis, confronted at every turn by groups of native Seraphon intent on driving back any intruders. Now, all four warbands converge and a final battle will be waged to determine who can lay claim to the fragment of the fabled ruin.
Terrain
This battleplan used the Triumph & Treachery free-for-all rules, with the exception that each warband's points limit is the same is it is for a normal campaign battle. In addition, if a player has an encampment location that increased their points limit, the increased points limit applies in this battle too.
Rather than rolling to determine initiative order, the initiative order is the same as the progress order, i.e. the player who made the most progress is first in the intitiative order, and so on.
Terrain
Set up terrain as normal.
Deployment
The players pick their deployment colour in progress order.
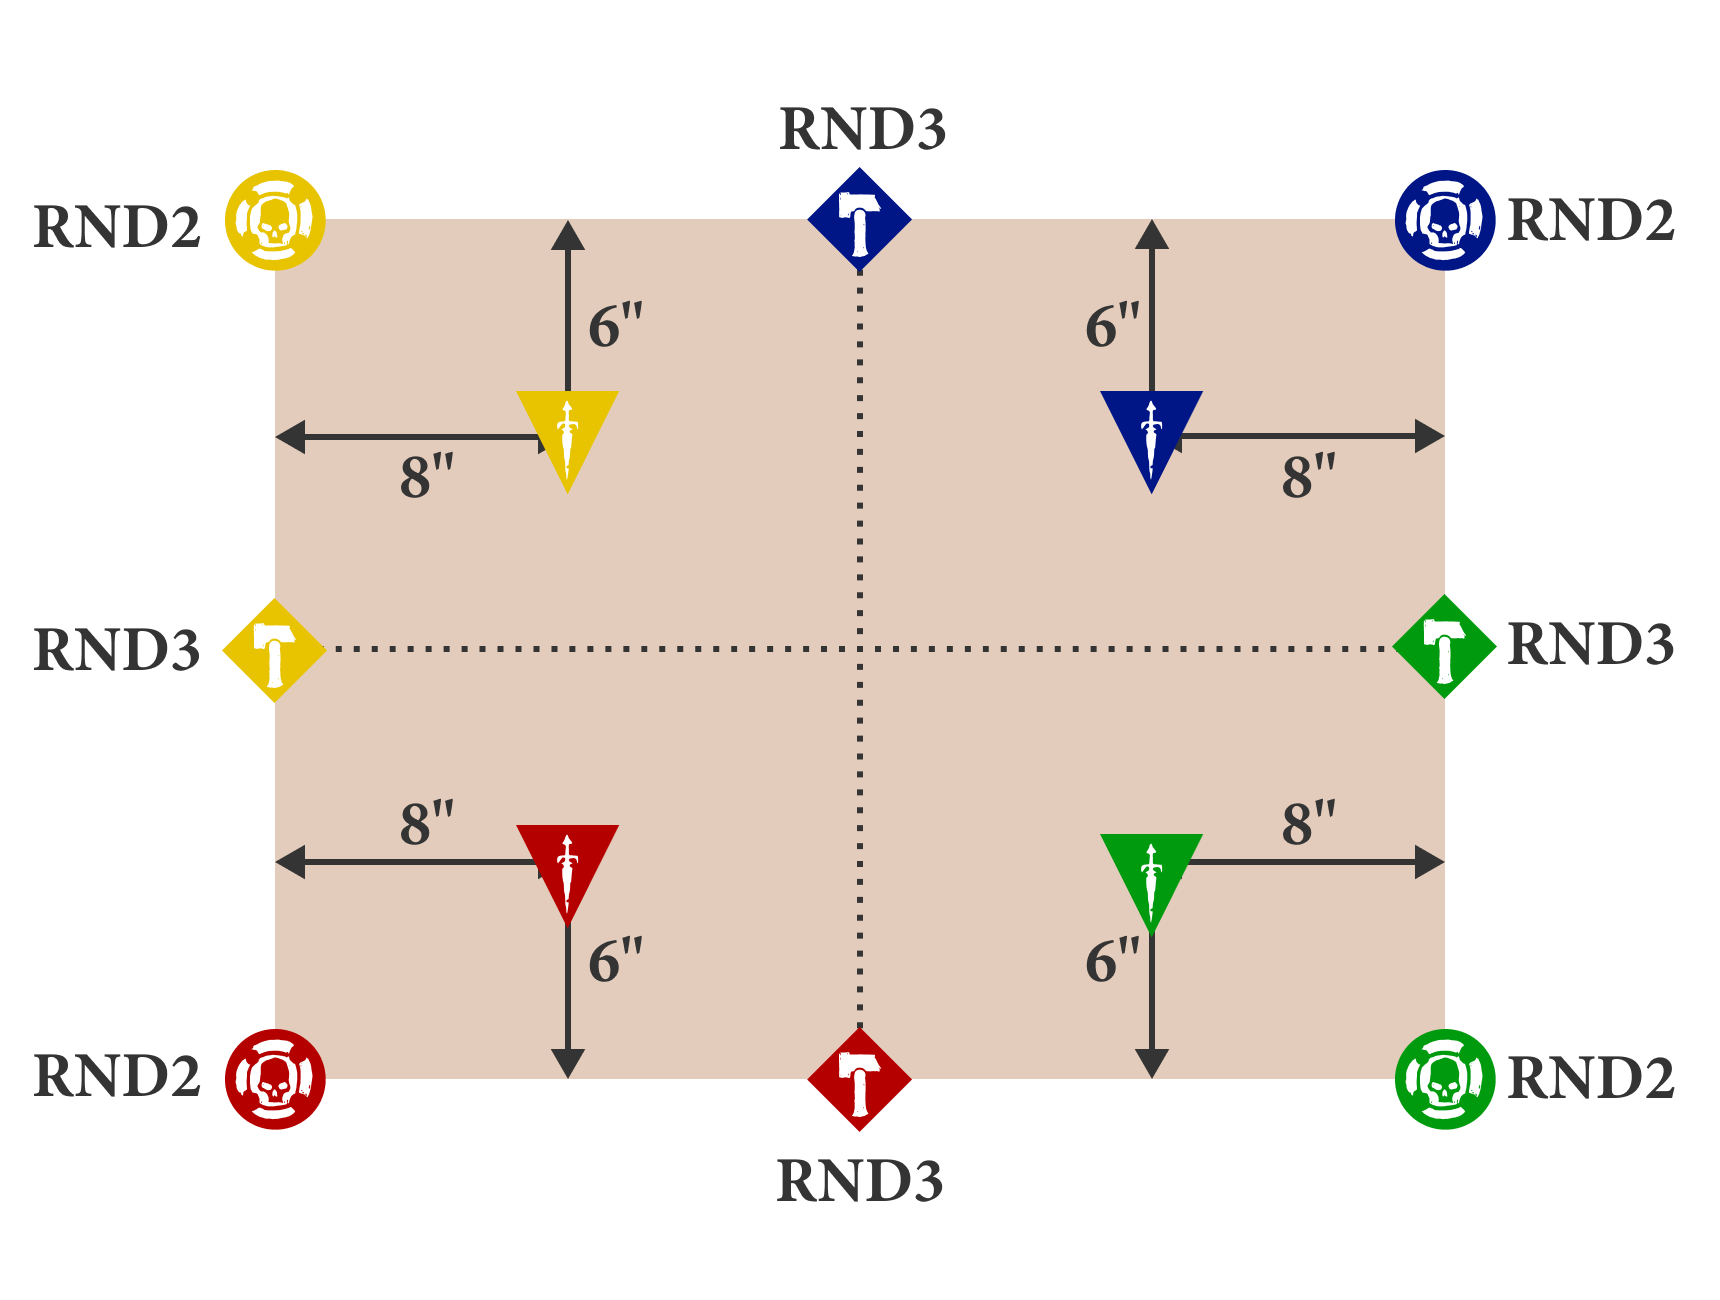
Victory
Before the battle, 1 objective is placed at the centre of the battlefield. In addition, the player who is first in the progress order sets up a group of Savage Seraphon fighters with a combined threat level of 6 within 3" horizontally of the centre of the battlefield.
At the end of the third or a subsequent battle round, the battle ends if a player controls the objective and there are no enemy fighters within 3" of the objective, including Savage Seraphon fighters. That player is the victor of the campaign arc.
Twist
Generate a twist as normal.