The Trail of Fire
Source: Stealth and Stone/Sundered Fate (out of print)
The battles fought within the Gnarlwood are usually affairs of disparate warbands; even the different Grand Alliances are plagued by infighting more often than they are united together. And yet, when a formidable warrior is able to rally multiple warbands to their cause, truly do the realms quake in fear as they march to battle, the sound of their blaring war-horns and stomping boots sending reverberations across the land. This campaign arc tells of one such tale: a mighty champion has marshalled several warbands and crowned themselves Grand Pyroclast. They now march deep into the Gnarlwood, intent on literally burning a path directly to the ruins of Talaxis in order to plunder and despoil all that can be found within. A hasty alliance of warbands and mercenaries is called to the defence. Will they be enough to halt this advancing horde before it burns the entire Gnarlwood to the ground?
Introduction
The Trail of Fire is a campaign arc for 4 or 6 players. In this campaign arc, the players are divided into 2 teams. One team are the trailblazers, a coalition of warbands set on creating a permanent path of safety through the Gnarlwood to the ruins of Talaxis. The other team are the preservers, warbands that consider any access to the ruins to be a disaster beyond reckoning and seek to prevent such from occurring.
The campaign lasts for 3 battles. During the first 2 rounds of battles, each player's warband will face a warband from the opposing team. The final battle of the campaign arc is a Coalition of Death team battle fought between all the players.
Getting Ready
The players divide their warbands into 2 teams, the trailblazers and the preservers. The warbands in each team do not need to be from the same Grand Alliance, but it will enhance the campaign arc if, narratively speaking, the warbands on each team are not averse to fighting alongside each other!
Each player in the preservers' team needs to decide if their warband's involvement is voluntary or unwitting. Players are encouraged to choose the role that best suits their warband narratively. For instance, a Seraphon or even a Stormcast Eternals warband would be aware of the significance of the ruins of Talaxis and seek to keep them sacrosanct, whereas a Daughters of Khaine warband would need to be led to the foe to ensure they battled the correct opponents. Voluntary warbands will get a bonus to renown rolls, while unwitting warbands will earn extra glory (as detailed later).
The players in the trailblazers' team must compare their warbands' reputation. The leader of the warband with the highest reputation is crowned the Grand Pyroclast. If more than one warband is tied for the highest reputation, the players roll off and the winner's leader is crowned the Grand Pyroclast. This fighter is the figurehead leading the trailblazers to war, but they will need to hold on to their position by securing victories (as detailed later). The leaders of the other trailblazers warbands are lackeys.
Playing Through The Campaign Arc
This campaign arc comprises 3 battles for each player. In the first 2 rounds of battles, each player's warband faces one from the opposing team in battle. The Grand Pyroclast's player decides which warbands will face each other in the first and second rounds. During the second round, players cannot battle the player they faced in the first round.
The following rules apply in the battles fought in the first two rounds:
- Once warbands have been picked and the fighters divided into battle groups, each player needs to choose 1 tactic for their warband and note it down in secret.
- The trailblazers can choose from the following tactics: Fearlessly Plunge into the Forest, Hack and Slash or Burn a Path.
- The preservers can choose from the following tactics: Cautious Ambushes, Trap the Way or Extinguish the Flames.
- The players then reveal their tactics and consult the battle matrix below to determine the deployment map and victory condition of the battleplan.
- Some results will state that a player has the advantage. If this is so, that player receives 1 additional wild dice at the start of the first battle round.
- The terrain map and twist are determined as normal.
The Aftermath Sequence
For the first 2 rounds of battles, the following rules apply in the aftermath sequence:
- If the preservers won the battle, each player with a voluntary warband adds 1 to renown rolls for their fighters.
- If the preservers won the battle, each player with an unwitting warband earns D6 additional glory.
Challenges of Leadership
Once reputations have been recalculated in step 7 of each aftermath sequence, if a lackey's warband has a higher reputation than the Grand Pyroclast's warband, that lackey can issue a leadership challenge. If more than one lackey could do so, only the one whose warband has the highest reputation can issue the challenge. If more than one lackey could still issue a leadership challenge, their players roll off and only the winner's lackey can issue the challenge.
A leadership challenge works as follows:
- A quick battle is fought between the leaders of each warband.
- The rules for picking your warband and setting up the battle are not used. Instead, the battlefield has no terrain, and each leader is set up 3" from the centre of the battlefield and 6" from the other leader.
- The battle is fought as normal.
- As soon as 1 leader is taken down, the battle ends and the other leader wins.
- No aftermath sequence is resolved for the leadership challenge, and quests cannot be furthered from it. However, an injury roll must still be made for the leader taken down.
- The victorious leader gains 1 level of renown.
- The victorious leader becomes the Grand Pyroclast; the other is now a lackey (and can challenge for leadership again later, if they are able to do so).
The Final Battle
The third round of this campaign arc is one final battle fought between all the players. The outcome of this battle will determine which team are declared the victors. This battle is a Coalition of Death team battle and uses the At All Costs battleplan below.
Planning Ahead
The final battle of the campaign arc has a set battleplan. This means the players will know how and where their battle groups will deploy before they choose which fighters are in which battle groups. We recommend the players take advantage of this and plan accordingly!
Rewards
In the aftermath sequence of the final battle, each player gains an additional D6 glory and can add 1 to renown rolls they make. In addition, each player on the winning team can roll once on the Treasures of the Gnarlwood table. If they roll an artefact that is already borne by a fighter in their warband, they can choose to either re-roll the result or gain an additional D6 glory.
Battle Matrix
Trailblazers Tactics are along the top and Preservers's Tactics are on the left.
| **Fearlessly Plunge into the Forest ** | **Hack and Slash ** | Burn a Path | |
|---|---|---|---|
| Cautious Ambushes | The trailblazers rush headlong into a series of carefully planned ambushes. Advantage: Preservers Deployment: Paths of Peril. The trailblazers are blue. Victory: Blood, Sweat and Blood. | Hacking through the forest at speed thwarts any ambush, and the preservers are brought to bat tie far earlier than they would like. Advantage: None Deployment: Twisted Route Victory: Drive Them Back. The preservers are the defenders. | 11-ie preservers lie in wait and are caught right in the middle of the inferno! Advantage: Trailblazers Deployment: Unknown Territory. The trailblazers are red. Victory: Raze |
| Trap the Way | There is not enough time to set any traps as the trailblazers smash into the preservers without warning! Advantage: Trailblazers Deployment: Double Ambush. Victory: Cut Off the Head. | Cutting vines, slashing bushes and hacking trees that are carefully primed with darts, poison gases and other traps leads to predictably painful and messy deaths on the part of the trailblazers. Advantage: Preservers Deployment: Paths of Peril. The preservers are blue. Victory: Cursed Fanes. | Traps and tree alike go up in smoke, but the preservers are long gone from those places. Once the trailblazers step out of thejlames, they are immediately brought to battle. Advantage: None Deployment: Battle in the Forest. Victory: Glimmers in the Dark. |
| Extinguish the Flames | The trailblazers push onwards, and with no flames to extinguish, the preservers quickly follow. Advantage: None Deployment: Twisted Route. Victory: Ley Lines. | The preservers trndge forwards, laden with magical and mundane ways to deal with a potentially immense blaze. Suddenly, the trailblazers emerge from the dense undergrowth and take their caravan unawares! Advantage: Trailblazers Deployment: On the Hunt. Victory: Entrance to Talaxis. | Despite their best efforts, the trailblazers can barely get a candle lit. The preservers take advantage of their confusion and capture a scout from whom to extract vital information. Advantage: Preservers Deployment: Double Ambush. Victory: Lost Patrol. The preservers are the attackers. |
Campaign Arc Battleplan: At All Costs
The trailblazers have done much harm to the Gnarlwood - at a steep price in blood and souls. Likewise, their endeavours have been badly stymied by the preservers, who have also received more than just a bloody nose for their efforts. Now the forces meet in one final confrontation to claim ultimate victory.
Attacker and Defender
In this battle, the trailblazers are the attackers and the preservers are the defenders.
Shared Resources
This battle uses the Shared Resource rule.
The Upper Hand
Each team totals the number of victories they have earned during the campaign arc. At the start of the first battle round, the team with the greater number of victories gains a number of additional wild dice equal to the difference.
Terrain
It is recommended that this battle is played on a battlefield 44"x30" in size. If so, use the rules for Larger Battlefields. Otherwise, set up terrain as normal.
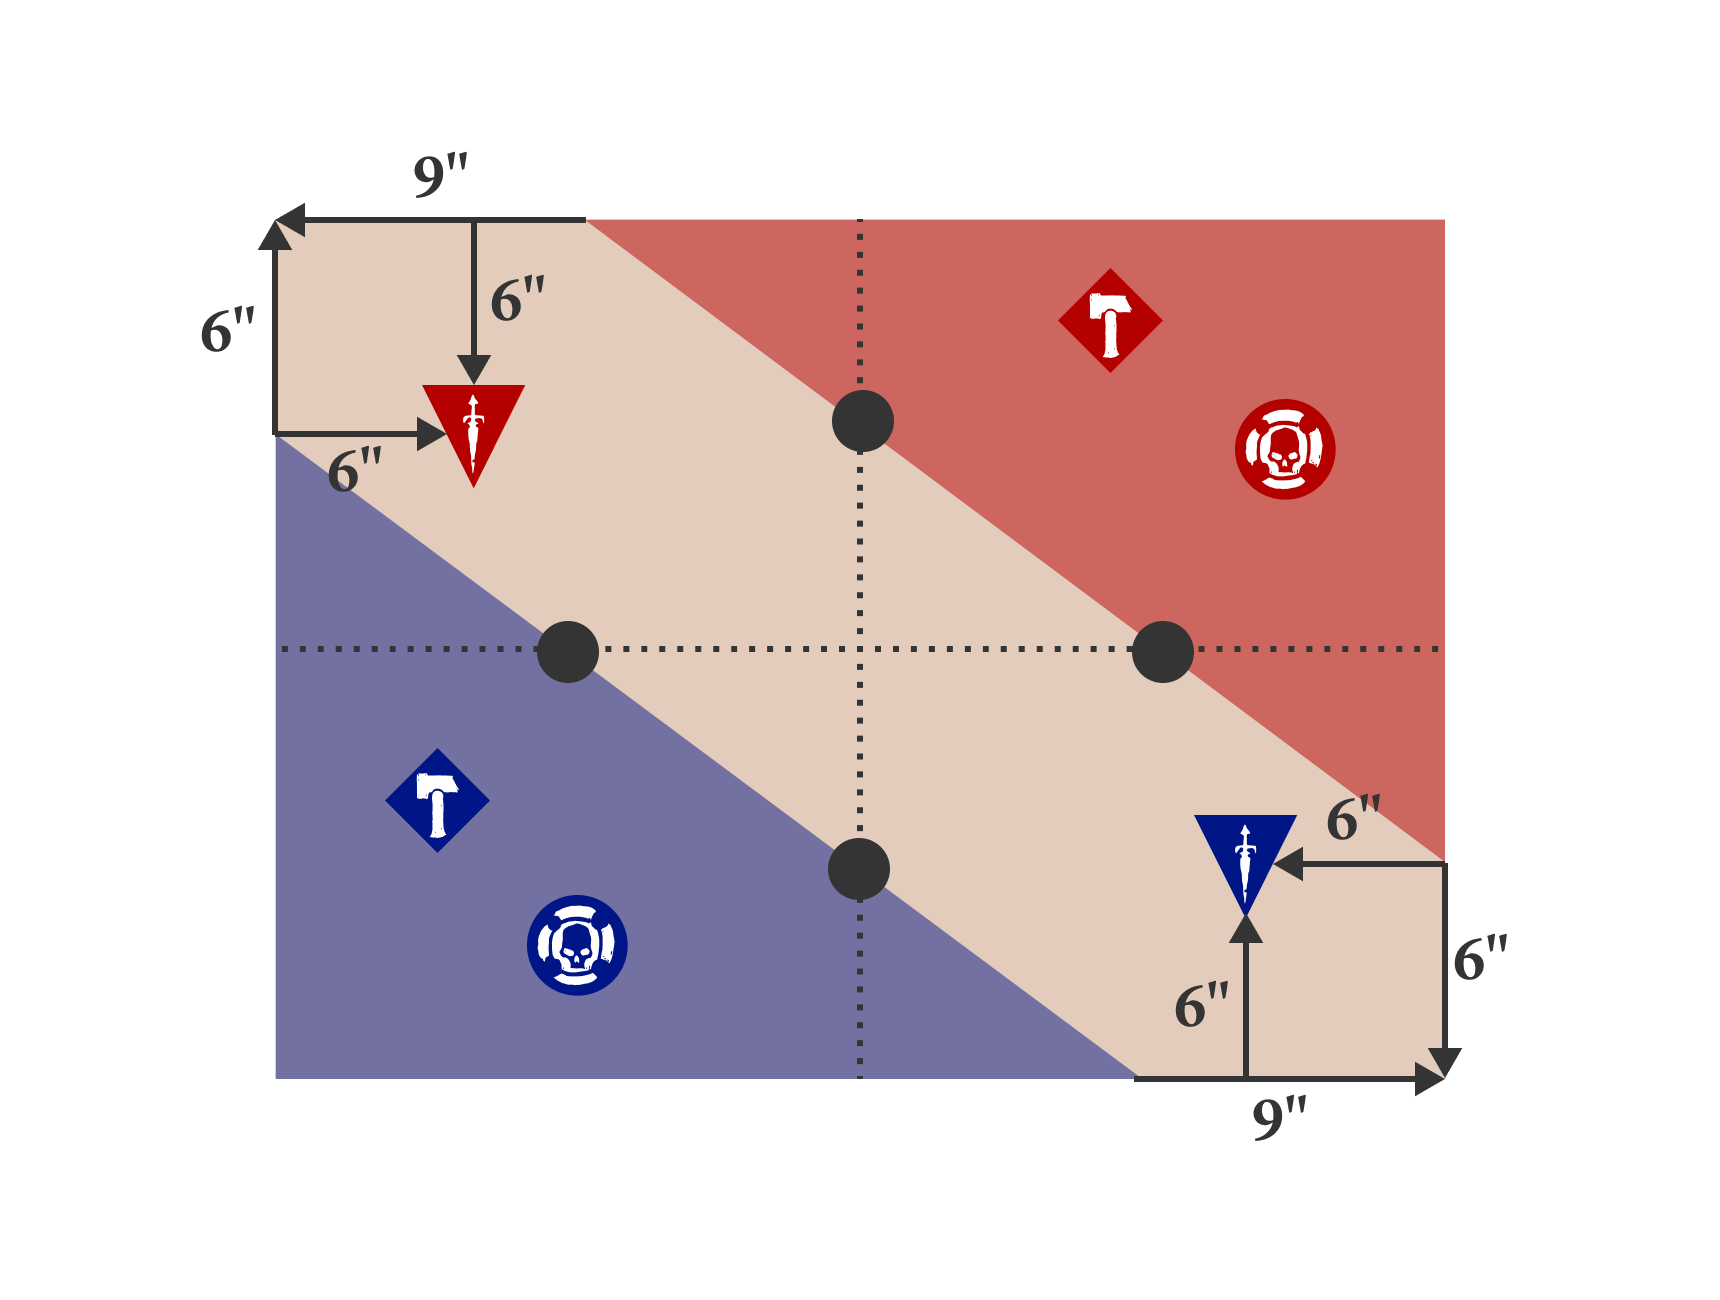
Deployment
Use the deployment map below. The defenders are blue and the attackers are red. Each black circle is an objective and must be placed on the battlefield floor. If a terrain feature is blocking the placement of an objective, place the objective on the battlefield floor as close as possible to the position marked.
Victory
The attackers and defenders earn 1 victory point each time an enemy fighter is taken down. At the end of the battle, the attackers earn 3 victory points for each objective that has been razed, and the defenders earn 3 victory points for each objective that has not.
To raze an objective, a fighter from the attackers' team must make 2 successive wait actions within 1" of an objective that has no fighters from the defenders' team within 3" of it.
The battle ends after 4 battle rounds. At the end of the battle, the team with the most victory points wins. If the teams have the same number of victory points, the attacker wins.
Twist
Draw a twist as normal. Then, the Grand Pyroclast decides if they will attack or wait. If they decide to attack, that twist is used for the battle. If they decide to wait, then can draw a new twist but the preservers count as having won 1 additional batle and the uppder hand must be redetermined. The Grand Pyroclast's player can repeat this step as many times as they wish until they choose to attack.