The Fell Alliance
Source: Rot and Ruin (out of print)
This campaign arc tells of a mighty champion who has brought together several warbands under a common cause and crowned themselves warleader. They now march on one of the larger settlements on the outskirts of the Gnarlwood, intent on razing it to the ground and dividing the spoils amongst their followers. A hasty alliance of warbands and mercenaries is called to the defence. Will they be enough to halt this advancing force before it reaches the settlement?
Introduction
The Fell Alliance is a campaign arc for 4-6 players. In this campaign arc, the players are divided into 2 teams. One team are the despoilers: a coalition of warbands set on destroying a settlement on the outskirts of the Gnarlwood. The other team are the guardians: warbands called to the defence of that settlement, be they sworn protectors or simple mercenaries looking to capitalise on the situation.
The campaign arc lasts for 3 battles. During the first 2 rounds of battles, each player's warband will face a warband from the opposing team. The final battle of the campaign arc is a Coalition of Death team battle fought between all the players.
Getting Ready
The players divide their warbands into 2 teams: the despoilers and the guardians. The warbands in each team do not need to be from the same Grand Alliance, but it will enhance the campaign arc if, narratively speaking, the warbands on each team are not averse to fighting alongside each other!
Each player in the guardians team needs to decide if their warband is acting as sworn protectors or mercenaries. Players are encouraged to choose the role that best suits their warband narratively. Sworn protectors will get a bonus to renown rolls, while mercenaries will earn extra glory (as detailed later).
The players in the despoilers team must compare their warbands' reputations. The leader of the warband with the highest reputation is crowned the warleader: this fighter is the figurehead leading the fell alliance to war, but they will need to hold onto their position by securing victories (as detailed later). The leaders of the other despoilers warbands are subordinates.
Embracing the Narrative
Players are encouraged to fill in a few of the narrative blanks to get the most out of this campaign arc. Firstly, it can be fun for the guardians to come up with a name for the settlement they are tasked with defending, as well as any other details that can bring it to life, such as its history and who its ruler is. The most adventurous might even draw a map of the local terrain: this would have no rules impact, but it would certainly enhance the players' enjoyment of the campaign arc!
With regard to the despoilers, the player in control of the warleader could give that fighter a suitably intimidating title to reflect their status, whilst the other players on their team could give some thought as to the motives of their own warbands: are they simply mercenaries, involved in this war to earn coin, or do they have a stronger conviction (be it a noble one or something more sinister)? Deciding on some or all of these details is an excellent way to bring the campaign arc to life and make it a memorable experience the players will never forget.
Playing Through The Campaign Arc
This campaign arc comprises 3 battles for each player. In the first 2 rounds of battles, each player's warband faces a warband from the opposing team. The warleader's player decides which warbands will face each other in the first and second rounds. During the second round, players cannot battle the player they faced in the first round.
The following rules apply during the battles fought in the first two rounds of battles:
- Once warbands have been picked and the fighters divided into battle groups, each player needs to choose 1 tactic for their warband and note it down in secret.
- The despoilers can choose from the following tactics: Barrel Forwards, Advance Cautiously or Flank.
- The guardians can choose from the following tactics: Fall Back, Stand Fast or Counter-attack.
- The players then reveal their tactics and consult the battle matrix overleaf to determine the deployment map and victory condition of the battleplan.
- Some results will state that a player has the advantage. If this is so, that player receives 1 additional wild dice at the start of the first battle round.
- The terrain map and twist are determined as normal.
The Aftermath Sequence
For the first 2 rounds of battles, the following rules apply in the aftermath sequence:
- If the guardians won the battle, each player with a sworn protectors warband adds 1 to renown rolls for their fighters.
- If the guardians won the battle, each player with a mercenaries warband earns D6 additional glory.
Challenges of Leadership
Once reputations have been recalculated in step 7 of each aftermath sequence, if a subordinate's warband has a higher reputation than the warleader's warband, that subordinate can issue a leadership challenge. If more than one subordinate could do so, only the one whose warband has the highest reputation can issue the challenge. If more than one subordinate could still issue a leadership challenge, their players roll off and only the winner's subordinate can issue the challenge.
A leadership challenge works as follows:
- A quick battle is fought between the leaders of each warband.
- The rules for picking your warband and setting up the battle are not used. Instead, the battlefield has no terrain, and each leader is set up 3" from the centre of the battlefield and 6" from the other leader.
- The battle is fought as normal.
- As soon as 1 leader is taken down, the battle ends and the other leader wins.
- No aftermath sequence is resolved for the leadership challenge, and quests cannot be furthered from it. However, an injury roll must still be made for the leader taken down.
- The victorious leader gains1 level of renown.
- The victorious leader becomes the warleader; the other is now a subordinate (and can challenge for leadership again later, if they are able to do so).
The Final Battle
The third round of this campaign arc is 1 final battle fought between all the players. The outcome of this battle will determine which team are declared the victors. This battle is a Coalition of Death team battle and uses the Raze and Ruin battleplan below.
Planning Ahead
The final battle of the campaign arc has a set battleplan. This means the players will know how and where their battle groups will deploy before they choose which fighters are in which battle groups. We recommend the players take advantage of this and plan accordingly!
Rewards
In the aftermath sequence of the final battle, each player gains an additional D6 glory and can add 1 to renown rolls they make. In addition, each player on the winning team can roll once on the Treasures of the Gnarlwood table. If they roll an artefact that is already borne by a fighter in their warband, they can choose to either re-roll the result or gain an additional D6 glory.
Battle Matrix
Guardian Tactics are along the top and Despoiler's Tactics are on the left.
| Fall Back | Stand Fast | Counter-attack | |
|---|---|---|---|
| Barrel Forwards | The despoilers surge forward, isolating a contingent of the guardians in an attempt to destroy them utterly. Advantage: Despoilers Deployment: Defiant Stand. The despoilers are red. Victory: Isolated. The despoilers are the attackers. | The guardians plant their feet and meet the charging despoilers head-on. Advantage: None Deployment: Show of Strength Victory: No Mercy. The despoilers are the attackers. | Using hidden paths within the Gnarlwood, the guardians ambush their foe! Advantage: Guardians Deployment: The Trap. The guardians are blue. Victory: Assassinate. The despoilers are the defenders. |
| Advance Cautiously | With neither side daring to make the first attack, a stalemate ensues that must be broken. Advantage: None Deployment: First Blood. Victory: No Quarter | Holding a valuable position within the Gnarlwood, the guardians prepare to defend it to the end. Advantage: Guardians Deployment: Stranglehold. The guardians are blue. Victory: Drive Them Back. The despoilers are the attackers. | The guardians attempt to spring an ambush, but they are drawn into a deadly trap! Advantage: Despoilers Deployment: Divide and Slaughter. The despoilers are red. Victory: Reaper |
| Flank | The guardian fall back to a stronger position, leaving the despoilers wrong-footed. Advantage: Guardians Deployment: Tentative Position. The despoilers are red. Victory: Seize Territory. The despoilers are the attackers. | The guardians find themselves cut off by a flanking force, and must now battle their way out! Advantage: Despoilers Deployment: Encircle. The despoilers are blue. Victory: The Gauntlet. The despoilers are the attackers. | As both forces seek to outmanoeuvre the other, blades are drawn and battle commences. Advantage: None Deployment: Bloodbath Victory: Raze |
Campaign Arc Battleplan: Raze and Ruin
Under the banner of their warleader, a coalition of warbands marches upon a settlement on the outskirts of the Gnarlwood, intent on setting it aflame and stripping it of anything of value. Its guardians, a ragtag coalition of sworn protectors and mercenaries, have fought the encroaching despoilers at every step of their advance, but now the final battle at the gates of the settlement is about to unfold...
Attacker and Defender
In this battle, the despoilers are the attackers and the guardians are the defenders.
Shared Resources
This battle uses the Shared Resource rule.
The Upper Hand
Each team totals the number of victories they have earned during the campaign arc. At the start of the first battle round, the team with the greater number of victories gains a number of additional wild dice equal to the difference.
Terrain
It is recommended that this battle is played on a battlefield 44"x30" in size. If so, use the rules for Larger Battlefields. Otherwise, set up terrain as normal.
Deployment
Use the deployment map below. The defenders are blue and the attackers are red.
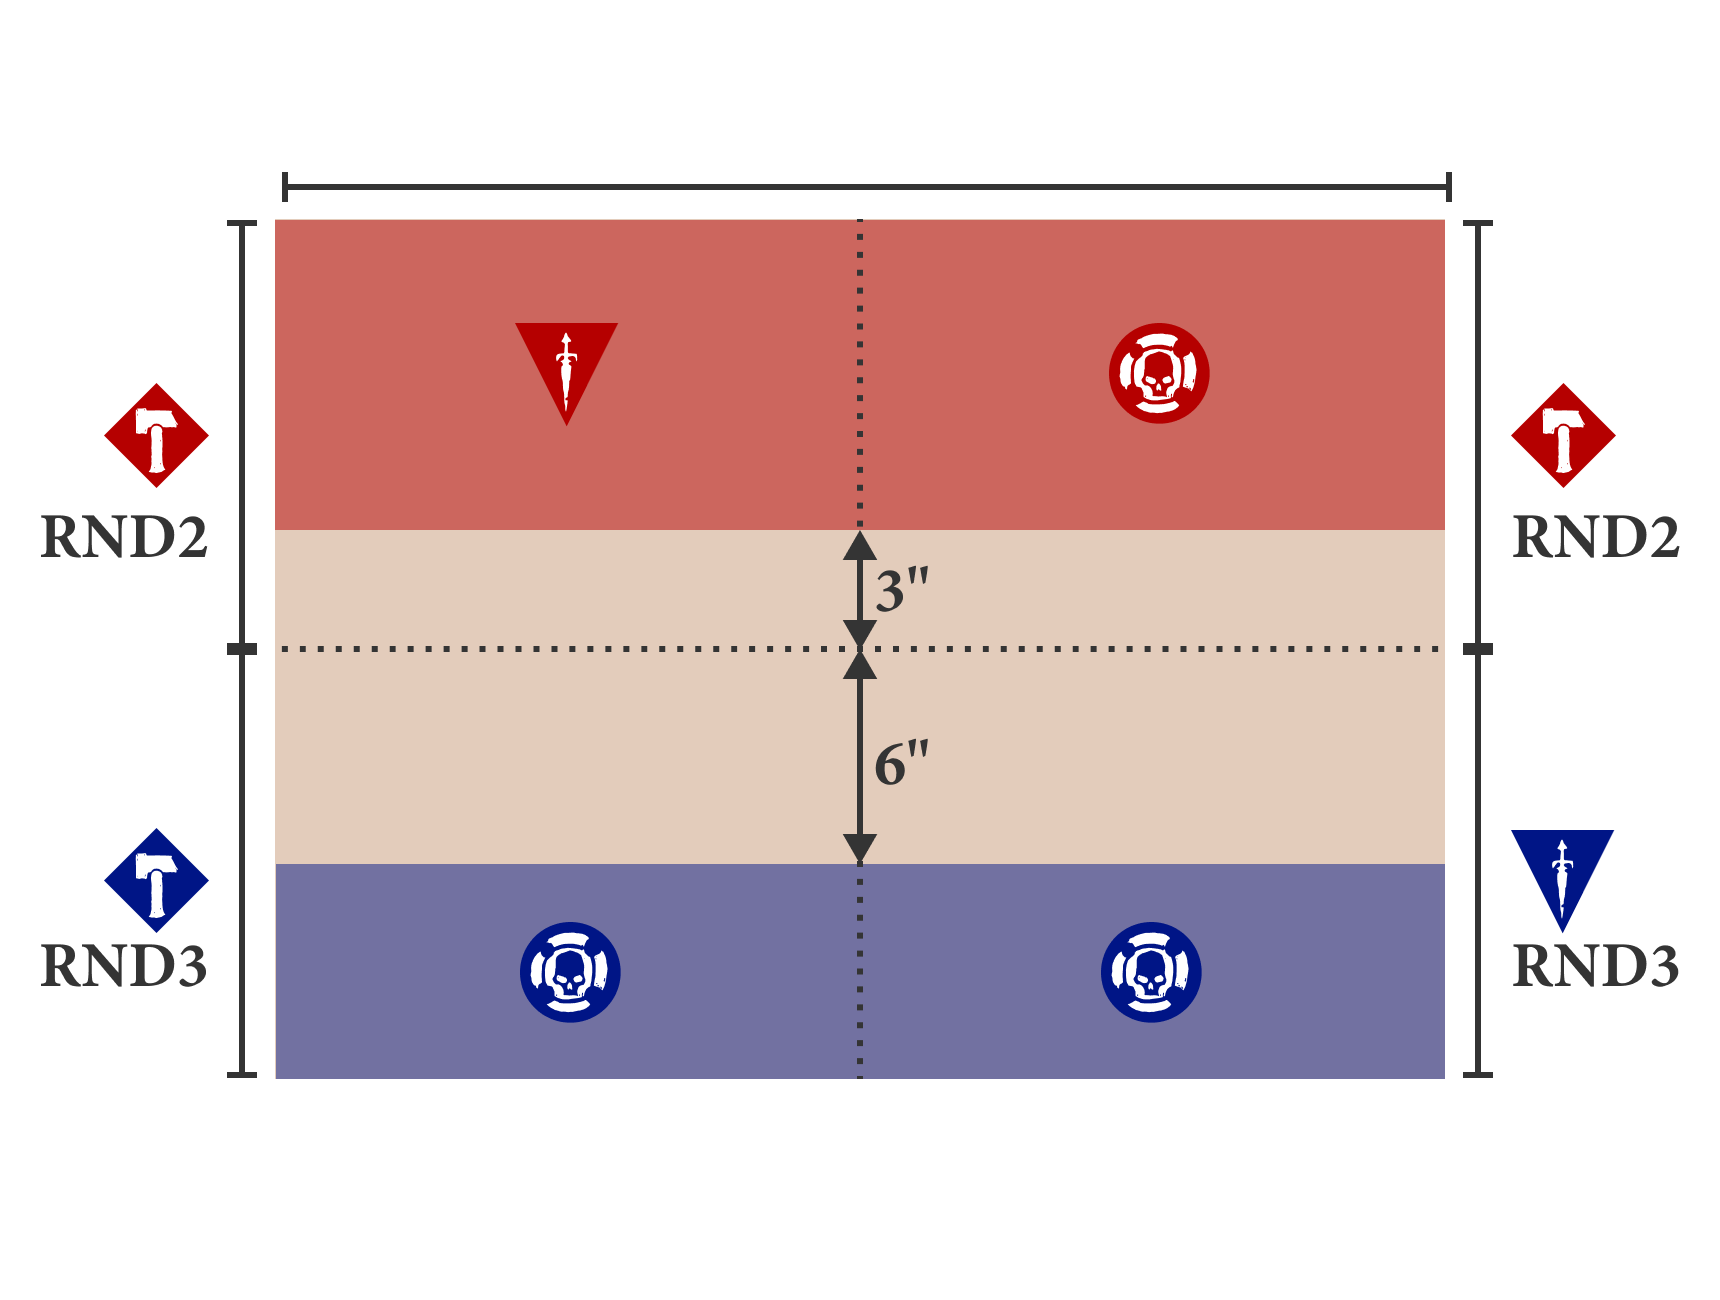
Victory
The defenders earn 1 victory point each time an enemy fighter is taken down. The attackers earn 3 victory points for each of their fighters wholly within the defender's deployment zone at the end of the battle.
The battle ends after 4 battle rounds. At the end of the battle, the team with the most victory points wins. If the teams have the same number of victory points, the attacker wins.
Twist
Draw a twist as normal. Then, the warleader's player decides if they will attack or wait. If they decide to attack, that twist is used for the battle. If they decide to wait, then can draw a new twist but the guardians count as having won 1 additional batle and the uppder hand must be redetermined. The warleader's player can repeat this step as many times as they wish until they choose to attack.
Reserves
There are 2 deployment lines for the attackers' Hammers. Fighters from the attackers' Hammers can be set up within 3" of either line when they arrive from reserve.