Gloomspite Gitz Quests
Source: White Dwarf #485 (out of print)
Tricksy Shinies
Though artefacts borne by the Gloomspite Gitz are, at first glance, barely worthy of the name, they are as real and deadly as any in the Mortal Realms, regardless of their provenance.
Pick 1 artefact of power from the Tricksy Shinies table (see page 47) and note it in your quest log. You cannot pick an artefact of power already borne by a fighter in your warband. While embarked upon this quest, you must keep track of the progress your warband makes, represented by a progress score. Add 1 to your progress score:
- Each time an enemy fighter makes an attack action and no damage points are allocated to the target.
- Each time an enemy fighter within 2" of 2 or more friendly fighters is taken down.
- The first time each friendly fighter from your warband picks up treasure.
- Each time you gain control of an objective that was controlled by another player earlier that combat phase.
- At the end of a battle if you won that battle.
You can complete this quest once your progress score is 9 or more. When you complete this quest, you obtain the artefact of power that was noted in your quest log
Tricksy Shinies Table
| Tricksy Shinies |
|---|
| Da Wun Hit Wunda It only works once, but it only needs to work once. When it actually works. Once per battle, the bearer can use this artefact as a bonus action. When they do so, roll a dice. On a roll of 4+, add the result of the roll to the Damage characteristic of each hit and critical hit made by the bearer's next melee attack action this activation. |
| Lucky Doodads This assortment of magical bric-a-brac has a powerful, if erratic, protective aura. Each time the bearer is targeted by a melee attack action, roll a dice. On a 6, count each hit scored from that attack action as a miss instead (critical hits are not affected). |
| Boingin' Bootz The bearer of these squighide boots occasionally goes ‘boing' and is catapulted into the air. Naturally, these boots are sometimes given as ‘gifts', especially when traversing mountain passs or deep underground canyons. Each time the bearer makes a move action, roll a dice. On a roll of 5+, the bearer's Move characteristic is increased to 10 and they gain the Fly () runemark for that move action. |
| Snufflesquig The owner of this exceptionally motivated Snufflesquig will be dragged around at breakneck pace while the squig searches for Looncaps and other valuables. The bearer can make disengage actions and their Move characteristic is not reduced while carrying treasure. In addition, add 2 to the Move characteristic of the bearer while they are not carrying treasure. |
| Crown of the Bad Moon This moon-shaped crown is very impressive and projects an air of limitless power… until the bearer's omnipotence is put into doubt. In battle rounds 1 and 2, the bearer can use abilities that require a [double] without using or needing ability dice. In battle round 3, the bearer can use abilities that require a [triple] without using or needing ability dice. In subsequent battle rounds, the bearer can use abilities that require a [quad] without using or needing ability dice. This artefact has no effect while the bearer has 10 or more damage points allocated to them. |
| The Biggun' Brew This exceptionally pungent potion causes those who take even the tiniest sip to temporarily increase in size and muscle mass until they tower over even the biggest boss. This increase in power is somewhat offset by the small chance of the user exploding, but most grots consider it well worth the risk. Once per battle, the bearer can use this artefact as a bonus action. If they do so, roll 2 dice. On a double, the bearer is taken down. Otherwise, add 10 to their Wounds characteristic and add 2 to the damage points allocated by each hit and critical hit from melee attack actions made by the bearer until the end of the battle. In addition, the bearer has a Move characteristic of 3 and the bearer loses the Fly () runemark if they have it. |
Da Fangs Of The Bad Moon
Some of the Shadow Piercers leading their warbands into the Gnarlwood do so in search of a unique offering to the Great Gatherer. They seek a trophy worthy enough to draw the gaze of their deity and earn them blessings that will elevate them to the ranks of the most feared killers in the Mortal Realms.
Colossal chunks of loonstone plummet to the ground whenever the Bad Moon passes overhead. Known as Fangs of the Bad Moon, these are sometimes carved into loonshrines by grots in the feverish grip of the Gloomspite, becoming a veritable lodestone for the gitz and their noisome allies. Finding the fangs is no great task, but finding one big enough to carve into a loonshrine certainly is.
While embarked upon this quest, you must keep track of a findin' score. Add 2 to your findin' score in step 4 of each campaign battle's aftermath sequence if you won the battle. In addition, you can pick up to 3 fighters from your warband that took part in the last battle and were not taken down, and send them forth to search for some fangs. To do so, roll a dice and add the score rolled to your findin' score. In addition, on a roll of 1, the fighter being rolled for is attacked by something within the Gnarlwood. Make an injury roll for that fighter.
While your findin' score totals 20 or more, you can fight battles using the ‘Carving the Loonshrine' quest battleplan. If you do so and you win the battle, in step 4 of the aftermath sequence, you can complete this quest. If you do so, in step 5 of the aftermath sequence, you can relocate your warband's encampment to a ‘Loonshrine Shanty' (see below) and do not need to spend any glory to do so.
Quest Battleplan: Carving The Loonshrine
‘They came over the hill in a vast tide, swarming like locusts. We thought that our time had come, but instead of attacking, they took their rusted, broken tools to the massive piece of rock we were studying. We took the opportunity to attack while they were distracted. 1 wish by Sigmar's grace we'd had the sense to flee.' – Tyberio Greyflint, survivor of the Glintspire Massacre
Attacker and Defender
In this battle, the questing player is the defender and the adversary player is the attacker.
Terrain
Set up terrain using the alternative terrain rules from page 61 of the Core Book. The defender must set up each terrain feature, and there must be 1 Loonshrine set up on the battlefield floor as centrally as possible. The Loonshrine is an obstacle.
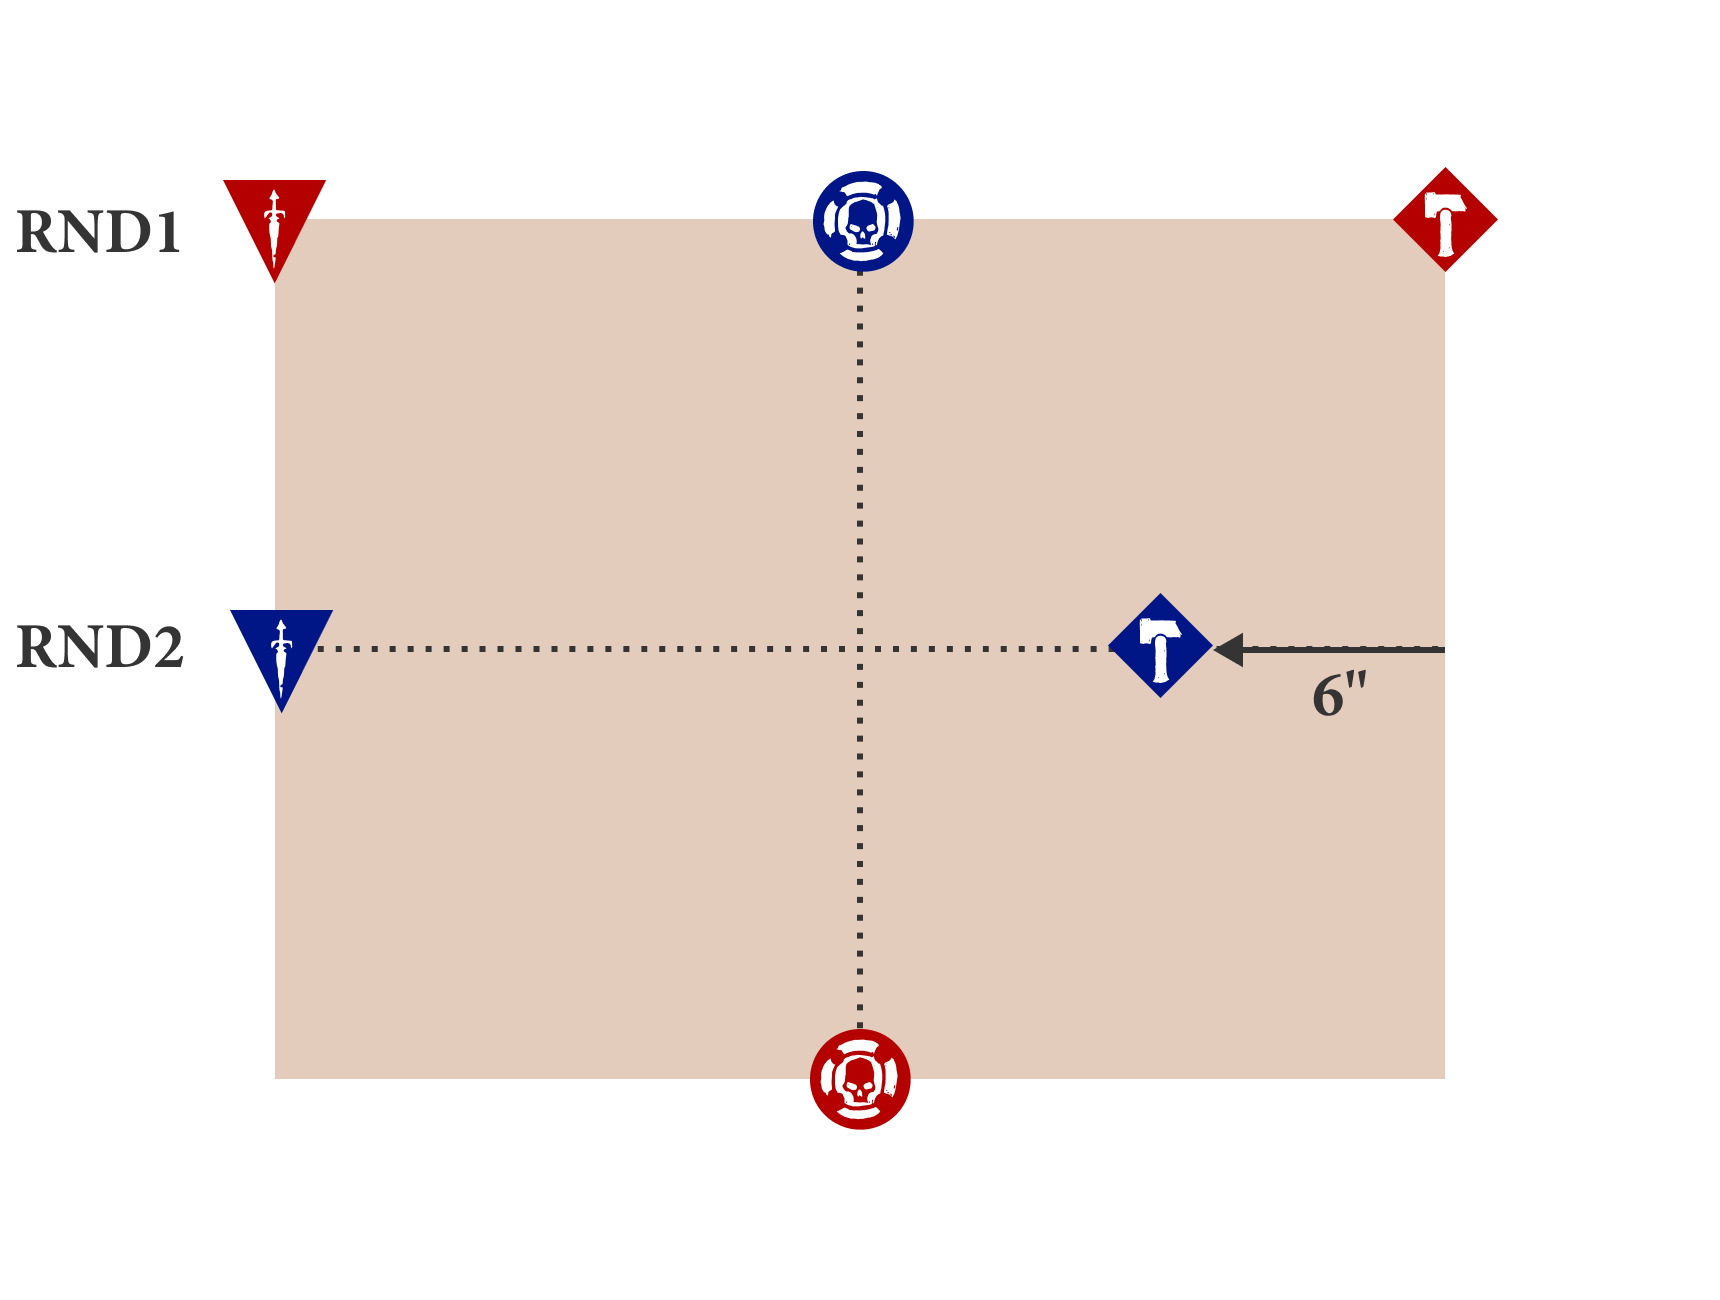
Deployment
Use the deployment map below. The defender is blue and the attacker is red.
Victory
The defender can treat the Loonshrine as an enemy fighter with a Toughness characteristic of 8. The Loonshrine cannot activate nor be taken down. The defender cannot target the Loonshrine with attack actions while they are within 1" of 1 or more other enemy fighters.
The battle ends after 4 battle rounds. At the end of the battle, if the Loonshrine has 30 or more damage points allocated to it, the defender wins. Otherwise, the attacker wins.
Twist
Determine a twist as normal.
The Aftermath Sequence
The adversary player receives the following bonus in the aftermath sequence:
Renown to be Earned: The adversary player adds 1 to each renown roll they make in this aftermath sequence.
Encampment Location: Loonshrine Shanty
| Location | Location Bonus | Points Limit | Reputation Modifier |
|---|---|---|---|
| Loonshrine Shanty As temporary a location as ever existed, this is less a sprawl of tents and lean-tos as it is a honeycomb of tunnels hewn into the rock beneath the loonshrine. The inevitability of collapse is ignored in favour of the meagre safety it provides. | Add 1 to renown rolls you make for fighters from your warband with the Hero runemark (). | 1200 | +3 |